


21
Using the Bitronics Software (continued)
Using any other parallel device (not printers or mass
storage devices) with a printer
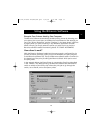
When dealing with other parallel port devices, they are set as “Scanners” in
the “Settings” (page 10). Examples of these are scanners, parallel port
cameras, and tape drives. When you need access to this device, simply
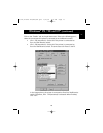
single-click on the Bitronics system tray icon, and select the device you wish
to use. A check mark will appear showing which device is connected. For
example, we have a scanner and a printer on the Bitronics switch:
You will be connected to the scanner device indefinitely. But let us say
you wish to print to the InkJet printer, the software will again
automatically switch to the port that has the printer and send the print
job. However, the switch will remain connected to the printer - it will not
change back to the Scanner, unlike the mass storage device mentioned
previously. This means that you have to use this method to switch to the
scanner each time you need to use it.
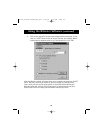
If no printers are installed
If no printers are installed, the “Settings” type (see page 10) for each device
must be set either for “Mass Storage Device” (if the device adds a drive
letter to your system), or “Scanner” (for all other types of devices).
The Bitronics software may not function properly in some systems if there is
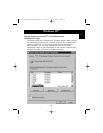
no DEFAULT PRINTER set. To do this, add a printer using the “Add Printer
Wizard” (click “Start”, “Settings”, “Printers”), and just use the “Generic/Text
Only” driver. Remember to use “Local Printer” and “LPT1” when the wizard
asks you. This will then be set as your default printer, so that the Bitronics
software can work properly.
En
P73121/F1U126-KIT/EU/man.qxd 4/28/00 1:06 PM Page 21