


27
Appendix (continued)
7. Select either “ECP”. Press ENTER.
8. Scroll to “Parallel Port” and press ENTER.
9. Select “Enabled” and press ENTER.
10. Press F10 to save these changes, confirm and exit. The system will restart
into Windows
®
.
Sony PCG-705/707/717/719 Notebooks:
1. In Windows
®
95, open the “Start Menu”.
2. Select “Sony Folder”.
3. Select “Sony Utilities”.
4. Select “Sony Notebook Setup”.
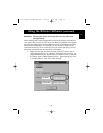
5. Select the “Printer/FDD” tab.
6. Make sure “Use as printer connector” is selected and choose the desired port
mode required by the printer. There are three options available on this screen:
1. “Normal” (Output only)
2. “Bi-directional” (default)
3. “ECP” (requires IEEE 1284 printer/parallel cable)
7. Select “ECP” and click “OK” to save results and close the window.
8. Click “Yes” to restart the computer.
Note: Changes made in the “Sony Notebook Utility” are also made in the BIOS.
Sony PCG-729:
1. In Windows
®
95, open the “Start Menu”.
2. Select “Tool Center”.
3. Select “Sony Notebook Setup”.
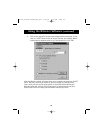
4. Select the “Printer/FDD” tab.
5. Make sure “Use as printer connector” is selected and choose the desired port
mode required by the printer. There are three options available on this screen:
1. “Normal” (Output only)
2. “Bi-directional” (default)
3. “ECP” (requires IEEE 1284 printer/parallel cable)
6. Select “ECP” and click “OK” to save results and close the window.
7. Click “Yes” to restart the computer.
Note: Changes made in the “Sony Notebook Utility” are also made in the BIOS.
En
P73121/F1U126-KIT/EU/man.qxd 4/28/00 1:06 PM Page 27