


Network printing from Windows
®
basic TCP/IP Peer-to-Peer printing
132
8
Configuring the standard TCP/IP port 8
Printer driver not yet installed 8
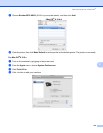
a Put the supplied CD-ROM into your CD-ROM drive. If the model name screen appears, choose your
machine. If the language screen appears, choose your language.
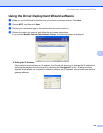
b The CD-ROM main menu will appear. Click Initial Installation or Advanced.
c Click Printer Driver (Only, for network).
d Click Next in response to the Welcome message. Follow the on-screen instructions.
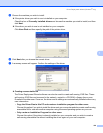
e Choose Standard Installation and click Next.
f Choose Brother Peer-to-Peer Network Printer, and then click Next.
g Follow the on-screen instruction, and then click OK.
Note
Contact your administrator if you are not sure about the location and name of the printer on the network.
h Continue through the Wizard clicking Finish when complete.
Printer driver already installed 8
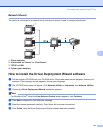
If you have already installed the printer driver and wish to configure it for network printing, follow these steps:
a For Windows Vista
®
:
Click the button, Control Panel, Hardware and Sound, and then Printers.
For Windows
®
XP:
Click the Start button and choose Printers and Faxes windows.
For Windows
®
2000:
Click the Start button and choose Settings and then Printers.
b Right click on the printer driver you wish to configure, and then choose Properties.
c Click the Ports tab and click Add Port.
d Choose the port that you wish to use. Typically this would be Standard TCP/IP Port. Then click the
New Port... button.
e The Standard TCP/IP Port Wizard will start.
f Enter the IP address of your network printer. Click Next.
g Click Finish.
h Close Printer Ports and Properties dialog box.