


Photo 3
Step 4
Set the hopper aside. If you have a waste
hopper fixture, set the waste hopper in the
fixture. If not, place the waste hopper on
the table.
(See Photo 4)
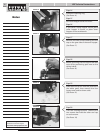
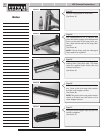
Photo 5
P
hot
o 6
St
ep 6
Remove the drum, blow off excess toner
with compressed air and clean with iso-
propyl alcohol. Wrap the drum in a protec-
tive paper or cloth and set it aside in a dark,
pr
ot
ec
ted place. (S
ee P
hot
o 6)
NO TE: We were able to use the OEM drum
onc
e af
ter the Oem cycle with no loss in
density, however, you may choose to
recoat or replace the drum after the first
recharge.
Need trust-worthy, detailed Technical
Instructions for another engine?
Visit: www.futuregraphicsllc.com
2 WX Technical Instructions
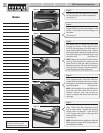
Photo 4
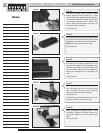
Step 3
Just like the HP4 cartridge, the two halves
of the cartridge can now be separated.
(See Photo 3)
Step 5
The drum axle is a metal rod that goes
through the center of the drum end to
end. On the large gear end of the axle is a
small white plastic retaining ring. Using a
drift punch and a hammer, tap directly on
the shaft (large gear side) and drive it out
the other end. (See Photo 5)
NO TE: Make sure you don’t lose the retain-
ing ring. The ring fits into a groove on the
drum shaft to hold the shaft in position.
Repeated removal will wear this ring and
the ring will no longer snap into position.
If the ring does not snap, replace it.
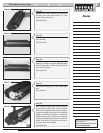
Photo 7
Step 7
Remove the primary charge roller from its
clips.
C
lean clips with isopr
opyl alcohol
and a cotton swab. Inspect the primary
charge roller for damage. Clean the pri-
mar
y charge roller with a mild soap and
water and set it aside.
(S
ee Photo 7)
NO TE: We have had no problems using the
OEM primary charge roller three cycles in
mild weather climates.
Notes