


Troubleshooting 71
Resulting Scanned Images Are Not Correct
If the resulting scanned images are not crisp, if there are lines or spots on the
images, or if there is some other problem with scanned images, likely causes
are listed below. Check each item and take the appropriate action.
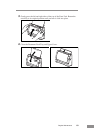
Cause The sensor glass or the rollers inside the scanner are dirty.
Remedy Clean the sensor glass and rollers as described on p. 54.
Cause The scanner’s internal platen glass is scratched.
Remedy Contact your local authorized Canon dealer or service
representative.
Cause The application software is not set up properly for
scanning.
Remedy Check the scanning related settings, such as brightness in the
application software.
For example, if the document cannot be scanned at all, it is
possible that the brightness setting is too high. If the resulting
scanned images are too dark, it is possible that the brightness
setting is too low.
Cause The scanner driver or application software is not running
normally.
Remedy If the software is set properly for scanning and scanning is still
not possible, it is possible that the scanner driver or the
application software is not running normally. Reinstall the
scanning driver or the application software. For details on how to
install the scanner driver, see “Installing the ISIS/TWAIN
Driver,” on p. 27. For details on how to install the application
software, refer to the application software instruction manual.
Cause Attempting to use a function of the DR-2050C that is not
supported by the application software.
Remedy Certain application software may not support auto page size
detection or other functions. You may experience abnormal
scanning results when scanning with such an application. If this
happens, try scanning again after turning off auto paper size
detection, etc.
If you continue to have problems with the scanned image after trying the
above countermeasures, try using the following procedure to adjust the
scanner.