


Starting Network ScanGear
3-10
Before Scanning
3
Starting Network ScanGear
Network ScanGear is started by accessing it from a TWAIN-compliant application as follows.
IMPORTANT
•
If you are using Network ScanGear for the first time after installing it, the network scanner to be
used must be selected with the ScanGear Tool. For details, see ‘Selecting the Network Scanner to
be Used,’ on p.3-8.
•
The Network ScanGear driver cannot be started at the same time as the ScanGear Tool. If the
ScanGear Tool is running, close it.
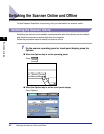
1
Switch the scanner online.
For details, see ‘Switching the Scanner Online and Offline,’ on p.3-2.
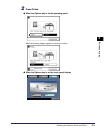
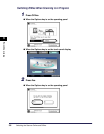
2
Start the application.
3
In the application, select Network ScanGear as the scanner to be
used.
In the application, choose the command that selects a scanner (for example, “Select
Scanner”, or “Select Source”), then select Network ScanGear in the dialog box that
appears.
After doing this operation once, there is no need to repeat it.
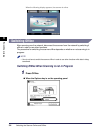
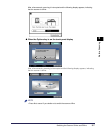
4
In the application, choose the command that starts scanning
operation (for example, “Scan New” or “Acquire”).
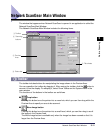
The Network ScanGear Main Window appears. Individual items in this window are
explained on the next page.
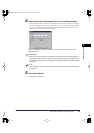
NOTE
•
See the documentation provided with your application for commands and procedures used to
select Network ScanGear and start scanning.