


E-27
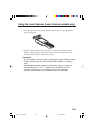
Using the C-MOS Imager (C-MOS Imager models only)
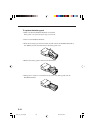
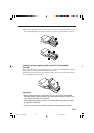
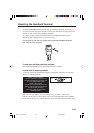
1. Turn on the Handheld Terminal, position its C-MOS Imager reader port near the
barcode or 2-dimensional code, and then press the Trigger Key (R or L).
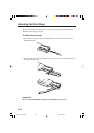
2-dimensional
code
Green light
Red light
2. The Handheld Terminal LED emits light and reads the code.
Indicator 1 (read operation indicator lamp) lights in green when the reading is successful.
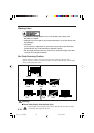
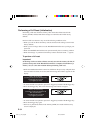
Barcode and 2-dimensional code Reading Guide
When you press the Trigger key (R or L), LEDs in the Handheld Terminal emit green
and red lights. Align the green light with the center of the barcode or 2-dimensional
code you are trying to read. Take particular care aligning the light when there are
other barcodes nearby.
When reading a large code, adjust the position of the Handheld Terminal so that the
entire code is enclosed within the red light.
Important!
•
If you have problem not properly reading a code, change the angle and/or the distance
between the label and the Handheld Terminal and try reading the code again.
• A code can be read from a distance of 40mm to 410mm (1
9
/
16
" to 1'4
1
/
8
"), and a 2-
dimensional code can be read from a distance of 50mm to 210mm (
1
1515
1515
15
⁄⁄
⁄⁄
⁄
1616
1616
16
" to 8
11
11
1
⁄⁄
⁄⁄
⁄
44
44
4
").
The actual reading distance depends on the code type and code resolution.
• For smaller codes, move the Handheld Terminal closer to the code.
• To read a large code, move the Handheld Terminal further away from the code.
•
Note that a special reader application is required to read barcodes and 2-dimensional
codes.
• The DT-X11M30E/M30U/M30RC support reading of 2-dimensional codes and
bar codes.
• Fingerprints, dust, dirt, or other foreign matter on the C-MOS Imager reader
port can cause abnormal reading. Should the code reader port become dirty,
wipe it clean with a soft, dry cloth.
• DT-X11M30U is available in the USA and Canada, and the rest of the C-MOS
Imager models are not.
DT-X11_E_P14_36.p65 06.2.6, 4:38 PM27