


G- and K-Series User’s Guide
4-6
7
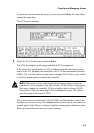
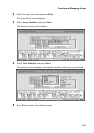
If the Number of Spares screen displays, enter the number of spares you want to
add and press Enter.
This creates dedicated spares that can only be used by this array. A dedicated
spare drive will not be available for any other use. For more information about
spares, see Chapter 6, Managing Spares.
If you do not want a spare, enter 0.
The Select Drives screen displays.
8
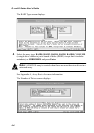
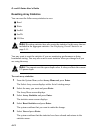
If the Select Drives screens displays, select the drive you want to use as a
dedicated spare and press Enter.
Only available drives, that is, drives that are not members of an array and are
not assigned as a dedicated or pool spares, display. You can delete a dedicated
spare from the array at any time. For more information see, Deleting a
Dedicated Spare on page 6-3.
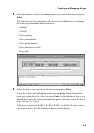
You select a drive by highlighting it and pressing Enter. Each selected drive
turns gray in the drive list. After you press Enter for the number of drives you
entered previously, the system automatically goes to the next screen. To skip a
drive, use the
↑
or
↓
keys.
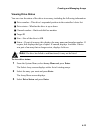
If the array you are creating is a RAID 3, RAID 4, RAID 5, or RAID 50, the
Chunk Size screen displays.
9
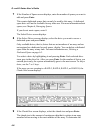
If the Chunk Size screen displays, select the chunk size and press Enter.
The chunk size is the amount of contiguous data that is written to an array
member before moving to the next member of the array. To determine the