


48-28
Catalyst 3750-X and 3560-X Switch Software Configuration Guide
OL-21521-01
Chapter 48 Configuring IP Multicast Routing
Configuring IP Multicast Routing
To remove the PIM device configured as the candidate RP, use the no ip pim send-rp-announce
interface-id global configuration command. To remove the switch as the RP-mapping agent, use the no
ip pim send-rp-discovery global configuration command.
This example shows how to send RP announcements ou
t all PIM-enabled interfaces for a maximum of 31
hops. The IP address of port 1 is the RP. Access list 5 describes the group for which this switch serves
as RP:
Switch(config)# ip pim send-rp-announce gigabitethernet1/0/1 scope 31 group-list 5
Switch(config)# access-list 5 per
mit 224.0.0.0 15.255.255.255
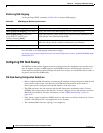
Preventing Join Messages to False RPs
Find whether the ip pim accept-rp command was previously configured throughout the network by
using the show running-config privileged EXEC command. If the ip pim accept-rp command is not
configured on any device, this problem can be addressed later. In those routers or multilayer switches
already configured with the ip pim accept-rp command, you must enter the command again to accept
the newly advertised RP.
To accept all RPs advertised with Auto-RP and reject all ot
her RPs by default, use the ip pim accept-rp
auto-rp global configuration command. This procedure is optional.
If all interfaces are in sparse mode, use a default-configured RP to support the two well-known
g
roups 224.0.1.39 and 224.0.1.40. Auto-RP uses these two well
-known groups to collect and distribute
RP-mapping information. When this is the case and the ip pim accept-rp auto-rp command is
configured, another ip pim accept-rp command accepting the RP must be configured as follows:
Switch(config)# ip pim accept-rp 172.10.20.1 1
Switch(config)# access-list 1 per
mit 224.0.1.39
Switch(config)# access-list 1 per
mit 224.0.1.40
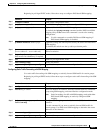
Filtering Incoming RP Announcement Messages
You can add configuration commands to the mapping agents to prevent a maliciously configured router
from masquerading as a candidate RP and causing problems.
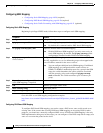
Step 5
ip pim send-rp-discovery scope ttl Find a switch whose connectivity is not likely to be interrupted, and
assign it the role of RP-mapping agent.
For scope tt
l, specify the time-to-live value in hops to limit the RP
discovery packets. All devices within the hop count from the source
device receive the Auto-RP discovery messages. These messages tell
other devices which group-to-RP mapping to use to avoid conflicts (such
as overlapping group-to-RP ranges). There is no default setting. The
range is 1 to 255.
Step 6
end Return to privileged EXEC mode.
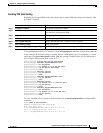
Step 7
show running-config
show ip pim rp mapping
show ip pim rp
Verify your entries.
Display active RPs that are cached w
ith associated multicast routing
entries.
Display the information cached in the routing table.
Step 8
copy running-config startup-config (Optional) Save your entries in the configuration file.
Command Purpose