


9-9
Cisco ASA Series Firewall CLI Configuration Guide
Chapter 9 Getting Started with Application Layer Protocol Inspection
Configuring Application Layer Protocol Inspection
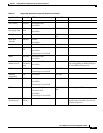
• H323—See the “Configuring an H.323 Inspection Policy Map for Additional Inspection Control”
section on page 11-6
• HTTP—See the “Configuring an HTTP Inspection Policy Map for Additional Inspection Control”
section on page 10-16.
• Instant Messaging—See the “Configuring an Instant Messaging Inspection Policy Map for
Additional Inspection Control” section on page 10-21
• IP Options—See the “Configuring an IP Options Inspection Policy Map for Additional Inspection
Control” section on page 10-25
• IPsec Pass Through—See the “IPsec Pass Through Inspection” section on page 10-25
• IPv6—See the “(Optional) Configuring an IPv6 Inspection Policy Map” section on page 10-27
• MGCP—See the “Configuring an MGCP Inspection Policy Map for Additional Inspection Control”
section on page 11-12.
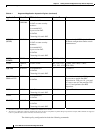
• NetBIOS—See the “Configuring a NetBIOS Inspection Policy Map for Additional Inspection
Control” section on page 10-30
• RADIUS Accounting—See the “Configuring a RADIUS Inspection Policy Map for Additional
Inspection Control” section on page 13-9
• RTSP—See the “Configuring an RTSP Inspection Policy Map for Additional Inspection Control”
section on page 11-16
• ScanSafe (Cloud Web Security)—See the “Configuring a Service Policy to Send Traffic to Cloud
Web Security” section on page 25-10
• SIP—See the “Configuring a SIP Inspection Policy Map for Additional Inspection Control” section
on page 11-20
• Skinny—See the “Configuring a Skinny (SCCP) Inspection Policy Map for Additional Inspection
Control” section on page 11-26
• SNMP—See the “Configuring an SNMP Inspection Policy Map for Additional Inspection Control”
section on page 13-10.
Step 3 To add or edit a Layer 3/4 policy map that sets the actions to take with the class map traffic, enter the
following command:
ciscoasa(config)# policy-map name
ciscoasa(config-pmap)#
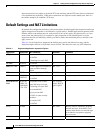
The default policy map is called “global_policy.” This policy map includes the default inspections listed
in the “Default Settings and NAT Limitations” section on page 9-4. If you want to modify the default
policy (for example, to add or delete an inspection, or to identify an additional class map for your
actions), then enter global_policy as the name.
Step 4 To identify the class map from Step 1 to which you want to assign an action, enter the following
command:
ciscoasa(config-pmap)# class class_map_name
ciscoasa(config-pmap-c)#
If you are editing the default policy map, it includes the inspection_default class map. You can edit the
actions for this class by entering inspection_default as the name. To add an additional class map to this
policy map, identify a different name. You can combine multiple class maps in the same policy if desired,
so you can create one class map to match certain traffic, and another to match different traffic. However,
if traffic matches a class map that contains an inspection command, and then matches another class map
that also has an inspection command, only the first matching class is used. For example, SNMP matches
the inspection_default class map.To enable SNMP inspection, enable SNMP inspection for the default