


30-13
Cisco ASA Series Firewall CLI Configuration Guide
Chapter 30 Configuring the ASA CX Module
Configuring the ASA CX Module
http://www.cisco.com/cisco/software/release.html?mdfid=284325223&softwareid=284399946
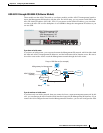
The boot software lets you set basic ASA CX network configuration, partition the SSD, and download
the larger system software from a server of your choice to the SSD.
Step 2 Download the ASA CX system software from Cisco.com to an HTTP, HTTPS, or FTP server accessible
from the ASA CX management interface. If you have a Cisco.com login, you can obtain the boot
software from the following website:
http://www.cisco.com/cisco/software/release.html?mdfid=284325223&softwareid=284399946
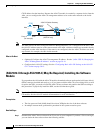
Step 3 Copy the boot software to disk0 on the ASA using the copy command. Do not transfer the system
software; it is downloaded later to the SSD. For example:
ciscoasa# copy tftp://10.1.1.1/asacx-boot-9.1.1.img disk0:/asacx-boot-9.1.1.img
Step 4 If you are replacing the IPS module with the ASA CX module, shut down and uninstall the IPS module,
and then reload the ASA:
ciscoasa# sw-module module ips shutdown
ciscoasa# sw-module module ips uninstall
ciscoasa# reload
After the ASA reloads, reconnect to the ASA CLI.
Step 5 Set the ASA CX module boot image location in ASA disk0 by entering the following command:
ciscoasa# sw-module module cxsc recover configure image disk0:file_path
Example:
ciscoasa# sw-module module cxsc recover configure image disk0:asacx-boot-9.1.1.img
Step 6 Load the ASA CX boot image by entering the following command:
ciscoasa# sw-module module cxsc recover boot
Step 7 Wait approximately 5 minutes for the ASA CX module to boot up, and then open a console session to
the now-running ASA CX boot image. The default username is admin and the default password is
Admin123.
ciscoasa# session cxsc console
Establishing console session with slot 1
Opening console session with module cxsc.
Connected to module cxsc. Escape character sequence is 'CTRL-SHIFT-6 then x'.
cxsc login: admin
Password: Admin123
Step 8 Partition the SSD:
asacx-boot> partition
....
Partition Successfully Completed
Step 9 Perform the basic network setup using the setup command according to the “Configuring Basic ASA
CX Settings at the ASA CX CLI” section on page 30-15 (do not exit the ASA CX CLI), and then return
to this procedure to install the software image.
Step 10 Install the system software from the server:
asacx-boot> system install url
Example:
The following command installs the asacx-sys-9.1.1.pkg system software.
asacx-boot> system install https://upgrades.example.com/packages/asacx-sys-9.1.1.pkg