


3-10
Cisco Aironet Wireless LAN Client Adapters Installation and Configuration Guide for Mac OS
OL-1377-02
Chapter 3 Installing the Driver, Client Utility, and Client Adapter
Configuring the Client Adapter
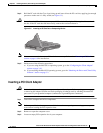
Step 4 Examine the client adapter and ensure the antenna is not attached to the card. The antenna connector and
the LEDs face out of your computer and are visible when you put the cover back on. The bottom edge
of the adapter is the connector you will insert into the PCI expansion slot.
Step 5 Tilt the adapter to allow the antenna connector and LEDs to slip through the opening in the computer
back panel.
Step 6 Press the client adapter into the empty PCI expansion slot until the adapter is firmly seated.
Caution Do not force or rock the adapter into the expansion slot as this could damage the adapter and the slot.
If the adapter does not insert easily, remove the adapter and reinsert it.
Step 7 Replace the computer cover.
Step 8 Attach the 2-dBi antenna to the adapter’s antenna connector until it is finger-tight. Do not overtighten.
Step 9 For optimal reception, position the antenna so it is straight up.
Step 10 Boot up your computer.
Step 11 Perform one of the following operations:
a. If you are using the Mac OS 9.x operating system, go to the “Basic Configuration on Mac OS 9.x”
section on page 3-10.
b. If you are using the Mac OS X operating system, go to the “Obtaining the Driver and Client Utility
Software” section on page 3-2.
Note Instructions are provided in the “Removing a PCI Client Adapter” section on page 8-7 in case you
ever need to remove your PCI client adapter.
Configuring the Client Adapter
This section describesthe client adapter’s configuration process forMac OS 9.x and MacOS X operating
systems.
Basic Configuration on Mac OS 9.x
Step 1 Click the apple-shaped icon in the top left corner of the desktop.
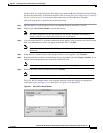
Step 2 Select Control Panels > AppleTalk. The AppleTalk window appears.
Step 3 Make sure the name of the correct wireless LAN adapter appears in the Connect via dialog box. If it does
not, click the up or down arrow on the right side of the Connect via dialog box and select the correct
adapter.
Step 4 Close the AppleTalk window.
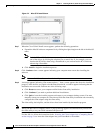
Step 5 If a window appears asking if you want to save changes to the current configuration, click the Save
button.
Step 6 Click the apple-shaped icon in the top left corner of the desktop.