


Configuring Secure Domain Routers on Cisco IOS XR Software
How to Configure Secure Domain Routers
SMC-147
Cisco IOS XR System Management Configuration Guide
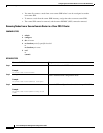
Step 6
location partially-qualified-nodeid
Example:
RP/0/0/CPU0:router(admin-config-sdr:rname)#
location 0/5/*
Assigns additional nodes to the SDR.
• Enter the value of the partially-qualified-nodeid argument
to specify a single node. The value of the nodeid argument
is entered in the rack/slot/* notation. Node IDs are always
specified at the slot level, so the wildcard (*) is used to
specify the CPU.
• Refer to the “Adding Nodes to a Non-Owner SDR” section
on page SMC-148 for more information.
Step 7
Repeat Step 6 as needed to add additional nodes to
the SDR.
Adds additional nodes to the SDR.
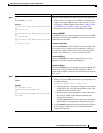
Step 8
exit (Optional) Exits the SDR configuration submode and returns to
Administration configuration mode.
Note Complete this step only if you need to create additional
SDRs.
Step 9
Repeat Step 3 through Step 7 as needed to create
additional SDRs.
Creates additional SDRs.
Step 10
end
or
commit
Example:
RP/0/0/CPU0:router
(admin-config-sdr:rname)# end
or
RP/0/0/CPU0:router(admin-config-sdr:rname)#
commit
Saves configuration changes.
• When you issue the end command, the system prompts you
to commit changes:
Uncommitted changes found. Commit them?
–
Entering yes saves configuration changes to the
running configuration file, exits the configuration
session, and returns the router to EXEC mode.
–
Entering no exits the configuration session and returns
the router to EXEC mode without committing the
configuration changes.
–
Entering cancel leaves the user in the same command
mode without committing the configuration changes.
• Use the commit command to save the configuration
changes to the running configuration file and remain within
the configuration session.
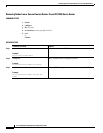
Step 11
Create a username and password for the new SDR. (Optional) Refer to the “Configuring a Username and Password
for a Non-Owner SDR” section on page SMC-157.
Command or Action Purpose