


Comments to ucs-docfeedback@cisco.com
20
Cisco UCS B230 Blade Server Installation and Service Note
OL-23811-01
Working Inside the Blade Server
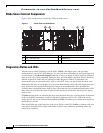
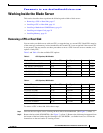
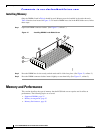
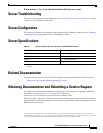
Figure 9 Inserting the CPU and Replacing the Heat Sink
Step 2 Close the socket latch. (See Figure 9, callout 2.)
Step 3 Lock the socket latch into place with the hook. (See Figure 9, callout 3.)
Step 4 Attach the thermal pad (also available as a spare A04-BTHP3=) provided with the replacement CPU or
server to the bottom of the heat sink, then remove the covering film from the side that will adhere to the
CPU. (See Figure 9, callout 4.)
Step 5 Replace the heat sink (N20-BHTS6). (See Figure 9, callout 5.)
Caution Make sure that the heat sink fins are aligned to run along the length of the blade server (see Figure 9).
Step 6 Secure the heat sink to the motherboard by tightening the two captive screws hand tight. (See Figure 9,
callout 6.)
3
1
2
6
6
5
4
199985