Mobile Internet PC Features
3-19
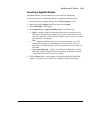
Formatting a SuperDisk Diskette
SuperDisk diskettes are preformatted so you can use them immediately.
If you need to reformat a SuperDisk diskette, complete the following steps:
1.
From the Windows desktop, double-click the
My Computer
G
icon.
2.
Right-click the
3½ Floppy (A:)
H
icon, then select
Format
.
3.
Select
120.3 MB
for the Capacity.
4.
Select
Quick
,
Full
, or
Copy system files only
for the Format type.
•
Quick
– Deletes all the files from the disk but does not scan the disk for
bad sectors. The Quick format option only works on disks that have been
previously formatted. You should choose Quick format if you are sure that
your diskette is not damaged.
•
Full
– Prepares a diskette so that you can store information on it. If the
diskette has any files on it, formatting will remove the files. If you are
formatting a 1.44-MB diskette, it will be scanned for bad sectors after it is
formatted.
•
Copy system files only
– Copies system files to a diskette that is already
formatted, without erasing the files on the diskette. A diskette containing
system files can be used to start your computer.
5.
Click the
Start
button. Your computer will begin formatting the SuperDisk
diskette. A progress bar will indicate its completion status in percentage.


