


Index–4 Maintenance and Service Guide
Index
Plastics Kit
contents 3–9
spare part numbers 3–3, 3–9
spare parts numbers 3–13
pointing device
components 2–1
illustrated 2–1
product description 1–3
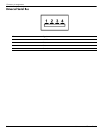
ports
eSATA/USB 2–9
external monitor 2–9
HDMI 2–9
RJ-11 2–8
USB 2–8
ports product description 1–3
power button
2–3
power connector and cable
location 2–8
removal 4–46
spare part number 3–6, 4–46
power connector cable, spare part number 3–12
power cord
location 2–12
set requirements 9–1
spare part numbers 3–11, 3–13
power light 2–2, 2–6
power requirements product description
1–3
Power Saving
5–4
power-on password
5–3
processor
product description 1–1
removal 4–57
spare part numbers 3–7, 3–15, 3–16, 4–57
Processor C6 State 5–4
product description
audio 1–2
chipset 1–1
display panel 1–1
Ethernet 1–2
external media card 1–3
graphics 1–1
hard drive 1–2
keyboard 1–3
memory 1–2
microphone 1–2
modem 1–2
operating system 1–4
optical drive 1–2
pointing device 1–3
ports 1–3
power requirements 1–3
processor 1–1
security 1–4
serviceability 1–4
webcam 1–2
wireless 1–3
product name 1–1, 3–1, 4–5
product number
3–1
R
rear components 2–7
recovery
full system 7–1, 7–5
programs or drivers 7–1
using the recovery discs 7–6
using the recovery partition 7–6
recovery discs
creating 7–2
defined 7–1
performing a recovery 7–6
Recovery Manager 7–1
recovery partition
defined 7–1
performing a recovery 7–6
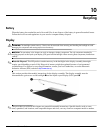
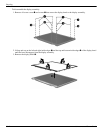
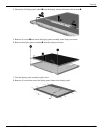
recycling
battery 10–1
display components 10–1
removal/replacement
preliminaries 4–1
procedures 4–5
restore points 7–1, 7–3, 7–4
restoring default settings in Setup Utility
5–2
right-side components
2–8
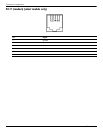
RJ-11 (modem) jack
connector pinout 8–4
location 2–8
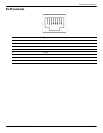
RJ-45 (network) jack
connector pinout 8–5
location 2–9
RTC battery
removal 4–12
spare part number 3–7, 3–12, 4–12
Rubber Feet Kit, spare part number 3–7, 4–6
Rubber Kit, spare part number
3–12
S
Screw Kit, spare part number 3–11, 3–12
screw listing
7–1
secondary hard drive self test
5–4
security cable slot
2–9
Security menu, Setup Utility
5–3
security product description
1–4
selecting in Setup Utility
5–2
serial number
3–1, 4–5
service considerations
4–1