


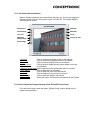

8. Adding your (Wireless) Internet Camera to your website
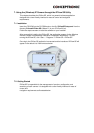
The (Wireless) Internet Camera can be added to your website, so that every visitor can see
what the IP Camera is seeing. To make this work, you need to follow the next steps:
8.1. Xplug Control Installation To Webserver
1. Installation:
Copy the “xplug.ocx” file from the directory “ActiveX” on the CD-ROM to any
WEB Server table.
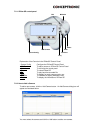
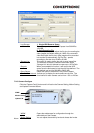
2. Setting (Configuration):
From the Web Configuration menu select “System” and under the “Loading
ActiveX From” input web server location (http://www.web server
location.com/).
Once the settings are completed, the user now is able to access the Internet Camera
from the web browser by selecting the image view – ActiveX mode.
NOTE:
It is highly recommended to install the Xplug Control application to the Web
Server for IE 5.0. It must be installed to a Public Domain with Fixed IP
address.
8.2. Configure the (Wireless) Internet Camera for Website Usage
1. Open the configurationpage of the (Wireless) Internet Camera through your
webbrowser. (Default: http://192.168.0.20
)
2. Open “System Administration” Æ “Configuration”.
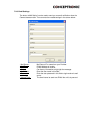
3. For security reasons, it is advised to setup an Admin Username and
Password, if you didn’t already set this. You can set the Admin Username
and Password at “Admin”.
4. Verify if the “Gateway” is configured in the (Wireless) Internet Camera. You
can check this at the section “Network”. The default gateway should be the
IP Address of, for example, your Router.
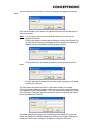
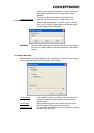
5. At the section “Network”, set the option “Second HTTP Port” to “Enable”
and enter the port you wish to use for your Camera (For example: Port 81)
6. Press “Save” and exit the configuration Page. The (Wireless) Internet
Camera is now setup correctly.
8.3. Router Configuration
To make it possible for the outside world to access your (Wireless) Internet Camera,
you need to open a port in the Router for access.
Usually this is called “Virtual Server” or “Port Forwarding” in the router. At this
section, you can enter a Local IP Address (The IP Address of your Camera) and an
inside and outside portnumber (The portnumber you set at step 8.2.5)
Refer to the manual of your router how to setup the Configuration of the router.
8.4. Website Configuration
8.4.1. Introduction
The last step is to integrate the Java™” Applet in your website. To make the
(Wireless) Internet Camera work on your website, you need to add some Java™
Code to the HTML Pages. This “Code” tells the browser of a visitor of your website
how to connect with the (Wireless) Internet Camera. Because Java™is used, visitors
without Java™” installed, can’t see the motion of the (Wireless) Internet Camera.
To make this work for the visitor, it is nessecary to install Java™ from the Java™
website, which can be found at: HTTP://JAVA.SUN.COM