


Crestron TPS-12G/15G/17G-QM Isys
®
G-Series Touchpanels
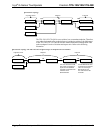
hair in the corner of the screen. A final message, “Touch Lower Right”, appears with
a cross hair in the correct corner. Touch the center of the cross hair in the corner of
the screen to conclude calibration and return to the CALIBRATION MENU.
NOTE: When touching the screen during calibration, be as accurate as possible.
Use the tip of a capped pen or the eraser end of a pencil. To cancel calibration and
return to the CALIBRATION MENU without saving calibration data, create a
calibration error by touching the screen in the same spot three times.
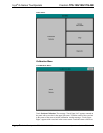
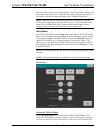
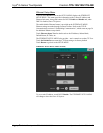
Setup Menu
To enter the SETUP MENU touch Setup on the MAIN MENU. The SETUP MENU
offers a series of buttons which open additional menus and displays and are detailed
in subsequent paragraphs. The SETUP MENU also provides Down/Up buttons to
control Screen Brightness, Key Backlight Brightness and Standby Timeout. The
Hardkey Test Results indicators will light when each respective button is pushed on
the touchpanel. After setup parameters have been selected, touch Return to go back
to the MAIN MENU.
NOTE: For convenience the current CRESNET ID setting is displayed in the upper
left corner.
NOTE: All touchpanel settings are automatically saved in non-volatile memory.
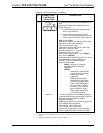
SETUP MENU
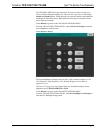
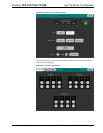
Advanced Options Menu
Touch Advanced Options to access the ADVANCED OPTIONS MENU. This
menu allows adjustments for Graphics Options, LCD Level Settings, Key Backlight
Level Settings and Auto Control Transition Rate. The Auto Control Transition Rate
Operations Guide – DOC. 6415B Isys
®
G-Series Touchpanels: TPS-12G/15G/17G-QM • 25