


Ports
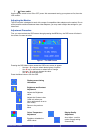
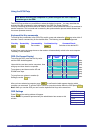
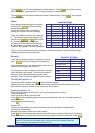
PORTS SETTINGS
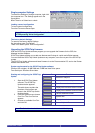
Name K B HKEY
01 COMPUTER 01 P S N O
02 COMPUTER 02 U 1 N O
03 SWITCH 03 P S C L F 1 1
04 COMPUTER 04 P S N O
05 COMPUTER 05 U 2 N O
06 COMPUTER 06 U 3 N O
07 COMPUTER 07 P S N O
08 COMPUTER 08 P S N O
In the Settings window navigate to the Ports line and
press ENTER. The Ports Settings window appears.
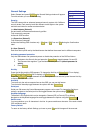
Name (Editing the computer name)
In this window you can edit the computer names with
up to 15 characters.
To erase a character you have to select it and then
press the Space Bar. Blank spaces remain in place of
the character.
To erase an entire line place the cursor at the
beginning of the line and press the space bar until the
line is erased.
(KB) Keyboard
The SCOUTutp operates with Windows, Linux, HP UX, Alpha UNIX SGI, DOS, Novell, MAC, USB or
Open VMS. By default the keyboard mode is set to PS for Intel based computers.
For the other systems set the KB column as follows:
PS Standard keyboard, MAC and SUN
U1 for HP UX
U2 for Alpha UNIX, SGI, Open VMS
U3 IBM AIX
Adding/changing a Hot Key (HKEY)
If you cascade the SCOUTutp by connecting another SCOUTutp Switch to a computer port instead of
a computer, you have to connect the utp cables to the new switch and you have to define the HOT
KEYS for the new OSD. When you cascade these hotkeys must be different for the top and bottom
layers.
To add/change a hotkey:
1. On the line to which the Switch is connected, press Tab to jump to the HKEY column.
2. Toggle between the options using the space bar.
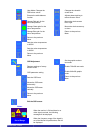
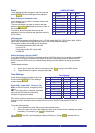
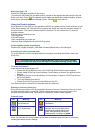
Time Settings
Time Settings
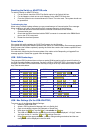
NAME
S C N L B L T / 0
0 1 COMPUTER 0 3 0 0 3 0 0 3 0
0 2 COMPUTER 0 3 0 0 3 0 0 3 0
0 3 SWITCH 0 3 0 0 3 0 0 3 0
0 4 COMPUTER 0 3 0 0 3 0 0 3 0
0 5 COMPUTER 0 3 0 0 3 0 0 3 0
0 6 COMPUTER 0 3 0 0 3 0 0 3 0
0 7 COMPUTER 0 3 0 0 3 0 0 3 0
0 8 COMPUTER 0 3 0 0 3 0 0 3 0
In the Settings window navigate to the Time
line and press ENTER. The Time Settings
window appears
Scan (SCN) - Label (LBL) - Time out (T/O)
SCN - In the SCN column, changes the scan
period.
LBL - In the LBL column, changes the display
period of the OSD label showing which
computer is currently accessed.
T/O - When password protection is activated you can automatically disable the Management
keyboard, mouse and screen after a preset time of non-use. Set this Timeout period in the T/O
column.
To set the above periods:
1. On the desired line press Tab to jump to the desired column.
2. Place the cursor over one of the 3 digits and type a new number. Enter a leading zero where
necessary. For example, type 0 4 0 for 40 seconds.
Typing 9 9 9 in the LBL column displays the label continuously. Typing 0 0 0 – the label will not
appear.
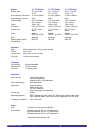
RackAccess i Series
10
User Guide