


Installing Drives 3-13
0DNHVXUHWKDWQRFDEOHFRQQHFWLRQVZHUHORRVHQHGGXULQJWKHSURFH
GXUH$UUDQJHFDEOHVVRWKDWWKH\ZLOOQRWLQWHUIHUHZLWKUHSODFLQJWKH
FRPSXWHUFRYHU
5HSODFHWKHFRPSXWHUFRYHUDQGWLJKWHQWKHFRYHUPRXQWLQJ
WKXPEVFUHZ
5HFRQQHFW\RXUFRPSXWHUDQGGHYLFHVWRWKHLUSRZHUVRXUFHVDQGWXUQ
WKHPRQ
,I\RXLQVWDOOHGDGULYHWKDWUHTXLUHVGHYLFHGULYHUVVXFKDVD&'520
GULYHUHIHUWRWKHGULYHVGRFXPHQWDWLRQIRUGULYHULQVWDOODWLRQ
LQVWUXFWLRQV
9HULI\WKHFRUUHFWRSHUDWLRQRIWKHGULYHE\UXQQLQJWKH'HOO'LDJQRVWLFV
UHIHUWR&KDSWHU´5XQQLQJWKH'HOO'LDJQRVWLFVµ
,QVWDOOLQJ(,'(+DUG'LVN'ULYHV
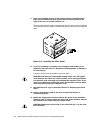
In addition to the externally accessible drive bays, your computer has bays for two
internal, one-inch-high hard-disk drives. Use the procedures in this section to upgrade
a hard-disk drive or install a second drive.
3ULPDU\+DU G' LV N' ULYH %D\
To install a drive in the primary hard-disk drive bay, follow these steps:
3UHSDUHWKHGULYHIRULQVWDOODWLRQDVGHVFULEHGHDUOLHULQ´&RQILJXULQJ
'ULYHVµ
NOTE: For EIDE drives, the boot drive should correspond to Primary IDE Master
in the system setup program.
5HPRYHWKHEH]HODVGHVFULEHGHDUOLHULQ´5HPRYLQJDQG5HSODFLQJWKH
%H]HOµ
5HPRYHWKHGULYHDOUHDG\LQVWDOOHGLQWKHED\
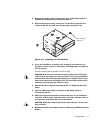
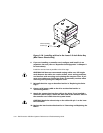
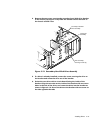
Remove the two screws securing the hard-disk drive to the front of the chassis
(see Figure 3-11). Disconnect any cables attached to the drive.
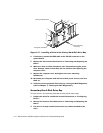
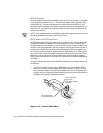
&RQQHFWD'&SRZHUFDEOHDQGWKH(,'(FDEOHWRWKHGULYHDVGHVFULEHG
HDUOLHULQ´&RQQHFWLQJ'ULYHVµ
&$87,210DWFKWKHFRORUHGVWULSRQWKHLQWHUIDFHFDEOHZLWKSLQRQ
WKHGULYHVLQWHUIDFHFRQQHFWRU
,QVWDOOWKHQHZGULYHLQWKHED\
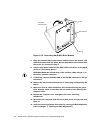
Orient the drive with its circuit board facing the front of the chassis, and place the
drive in the card-guide assembly as shown in Figure 3-11. Secure the drive to the
chassis with the two screws you removed in step 3.