


14 Getting Started
www.dell.com | support.dell.com
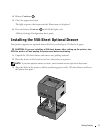
Specifying the media type and size loaded into each tray will help prevent jams. See
"Configuring the Paper Trays" on page 14 for more information.
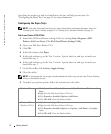
Configuring the Paper Trays
NOTE: You must first install the drivers for your printer before configuring the paper trays. See
"Setting Up for Local Printing" on page 27 or "Setting Up for Network Printing" on page 37.
Dell Laser Printer 1710/1710n
1 Launch the Dell Local Printer Settings Utility by clicking Start→Programs→Dell
Printers→
Dell Laser Printer 1710→Dell Local Printer Settings Utility.
2 Select your Dell Laser Printer 1710.
3 Click OK.
4 In the left column, click Paper.
5 In the right column, go to the Tray 1 section. Specify what size and type of media you
loaded into tray 1.
6 In the right column, go to the Tray 2 section. Specify what size and type of media you
loaded into tray 2.
7 On the Menu Bar, click Actions→Apply Settings.
8 Close the utility.
NOTE: If you change the size or type of media loaded into either tray, use the Local Printer Settings
Utility to reconfigure the tray.
9
To update your printer options, follow the instructions in the table.
Windows XP
1 Click Start→Control Panel→Printers and Other Hardware→Printers and
Faxes.
2 Right-click the Dell Laser Printer 1710 icon.
3 Click Properties→Installed Options→Ask Printer.
4 Click OK→OK. Close the Printers folder.
Windows 2000
Windows NT 4.0
1 Click Start→Settings→Printers.
2 Right-click the Dell Laser Printer 1710 icon.
3 Click Properties→Installed Options (or Options)→Ask Printer (or Update
Now).
4 Click OK→OK. Close the Printers folder.