62 Configure paper trays
www.dell.com/supplies | support.dell.com
Type and size settings
Set the driver and Dell Local Printer Setup Utility to the type and size of paper loaded in
the paper trays.
1 Launch the Dell Local Printer Setup Utility (Start → Programs → Dell Printers → Dell
Laser Printer P1500 →
Dell Local Printer Setup Utility).
2 Select your Dell Laser Printer P1500.
3 Click OK.
4 In the left column, click Paper.
5 In the right column, go to the Tray 1 section. Specify what size and type of media you
loaded into tray 1.
6 In the right column, go to the Tray 2 section. Specify what size and type of media you
loaded into tray 2.
7 On the Menu Bar, Click Actions → Apply Settings.
8 Close the utility.
NOTE: If you change the size or type of media loaded into either tray, use the Local Printer
Setup Utility to reconfigure the tray.
9
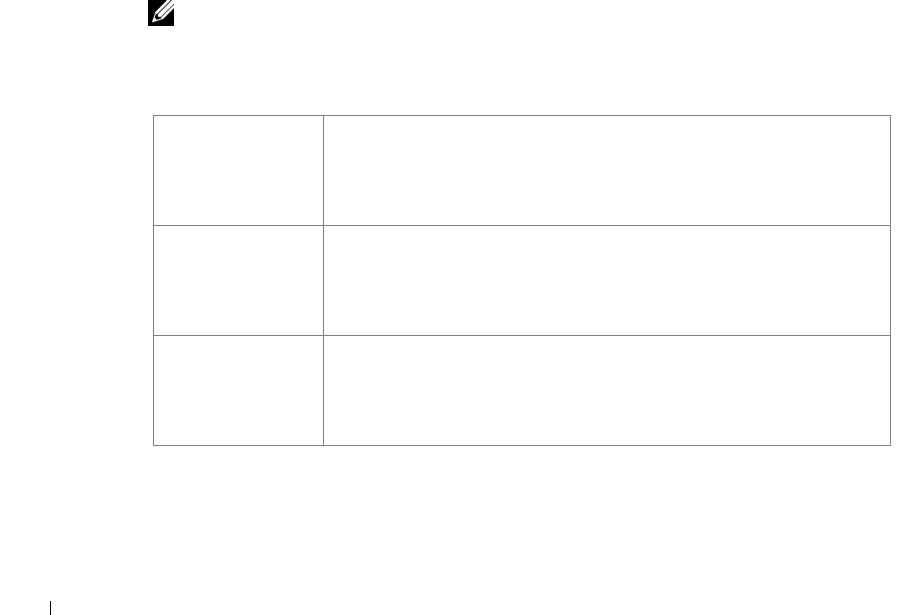
Update your driver by following the instructions in the table.
Windows XP 1 Click Start → Settings → Printers and Faxes.
2 Right-click the Dell Laser Printer P1500 icon.
3 Click Properties → Device (or Options) → Update (or Update Now).
4 Click OK → OK. Close the Printers folder.
Windows 2000
Windows NT 4.0
1 Click Start → Settings → Printers.
2 Right-click the Dell Laser Printer P1500 icon.
3 Click Properties → Device (or Options) → Update (or Update Now).
4 Click OK → OK. Close the Printers folder.
Windows Me
Windows 98
1 Click Start → Settings → Printers.
2 Right-click the Dell Laser Printer P1500 icon.
3 Click Properties → Device (or Features) → Update (or Update Now).
4 Click OK → OK. Close the Printers folder.


