


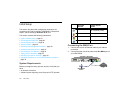

37 | Configuring a Stateful HA Pair
Initial High Availability Setup
Before you begin the configuration of HA on the primary Dell
SonicWALL appliance, perform the following setup:
• On the bottom panel of the secondary Dell SonicWALL
appliance, locate the serial number and write the number
down. You need to enter this number in the High Availability
> Settings page.
• Verify that the primary appliance and secondary appliance
appliances are registered, running the same SonicOS
versions.
• Make sure the primary and secondary appliances’ LAN, WAN
and other interfaces are properly configured for failover.
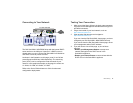
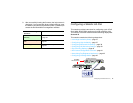
• Connect the HA ports on the primary and secondary
appliances with a CAT6-rated crossover cable (red crossover
cable). The primary and secondary appliances must have a
dedicated connection using the HA interface. Dell SonicWALL
recommends cross-connecting the two together using a CAT
6 crossover Ethernet cable, but a connection using a
dedicated 100Mbps hub/switch is also valid.
• Power up the primary appliance, and then power up the
secondary appliance.
• Do not make any configuration changes to the primary’s HA
interface; the High Availability configuration in an upcoming
step takes care of this issue. When done, disconnect the
workstation.
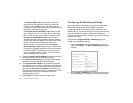
Configuring High Availability
The first task in setting up HA after initial setup is configuring
the High Availability > Settings page on the primary Dell
SonicWALL appliance. Once you configure HA on the primary
appliance, it communicates the settings to the secondary
appliance.
To configure HA on the primary SonicWALL, perform the
following steps:
1. Navigate to the High Availability > Settings page.
2. Select the Enable High Availability checkbox.
3. Under SonicWALL Address Settings, type in the serial
number for the secondary SonicWALL appliance.
You can find the serial number on the bottom of the Dell
SonicWALL appliance, or in the System > Status screen of the
secondary unit. The serial number for the primary Dell
SonicWALL appliance is automatically populated.
4. Click Apply to retain these settings.