


4 Using Web-Based Management DNswitch 800
Setting a Default Gateway
The default gateway parameter defines the IP address of a router or other
network device to which IP packets are to be sent if destined for a subnet
outside of that in which the switch is operating. This parameter must be
set if you are attempting to manage the switch using Digital Networks
WebView from a remote network or across the Internet.
1. Starting at the Main Menu of the console user interface, select
Management Setup Menu / Network Configuration / IP Configuration.
2. Select Gateway IP from the menu and enter the router IP address.
Press <APPLY>.
Setting the Administrator Password
Management access to the switch using Digital Networks WebView is
restricted based on the an administrator password. Administrators have
read/write access for parameters governing the switch. You should
therefore assign a password to the default administrator (User Name:
admin) as soon as possible, and store it in a safe place. (If for some
reason your password is lost, or you cannot gain access to the system’s
configuration program, contact Digital Networks Technical Support for
assistance.)
1. Starting at the Main Menu of the console user interface, select
Management Setup Menu / Console Login Configuration.
2. Move to the Password field for the User Name “admin” in this menu,
and enter the password. Press <APPLY>.
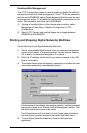
Setting Trap Destinations
If you wish to record SNMP traps, or events, generated by the switch, you
must configure the destination for IP Trap Managers. A trap destination is
the IP address of the system being used to manage the device, in this
case the IP address of the computer system on which Digital Networks
WebView is being run.
1. Starting at the Main Menu of the console user interface, select
Management Setup Menu / SNMP Configuration / IP Trap Managers.
2. Select an entry for an IP Trap Manager from the menu, then enter the
IP address and community name.
3. Move to the Status field, and use the Space bar to select ENABLED.
4. Press <APPLY>.