4
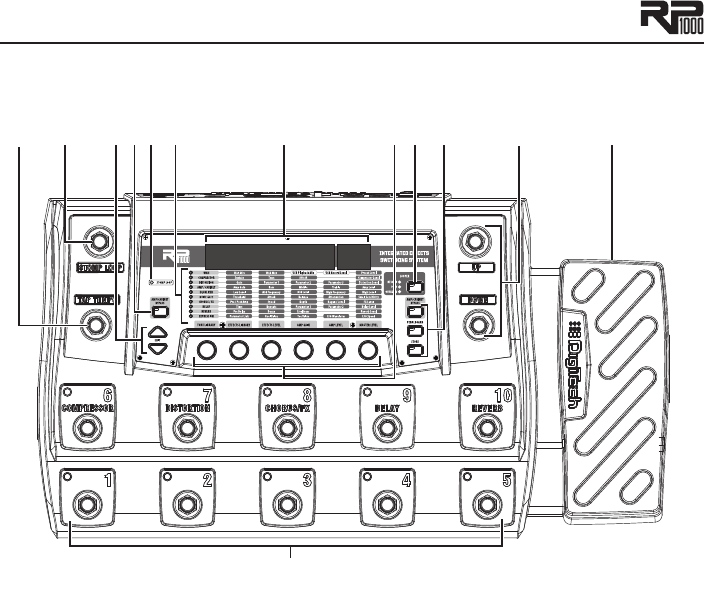
A Guided Tour of the RP1000
Front Panel
1
2
3
4
5
6
7
8 9
1 0
1 1 1 2
13
1. Tap Tempo Footswitch
Step on this footswitch repeatedly in time with your music to get the delay to sync up with the
music’s rhythm.
2. Stomp Loop Footswitch
This footswitch enables and disables the mono stompbox effects loop.
3. Edit Up/Down Buttons
These buttons navigate up and down the rows of the matrix for editing presets.
4. Amp Loop Button
This button enables and disables the external Amp/Preamp loop. The button lights when the
Amp/Preamp loop is active. If no connections are made to the loop,
appears in the
display briefly when the button is engaged or disengaged.
5. Stomp Loop LED
This LED lights when the Stomp Loop is activated using the Stomp Loop footswitch. When
the LED is off, the Stomp Loop is inactive. Note that the Stomp Loop button’s LED turns red
when its position is pre amp model and amp loop, and green when it’s post amp model and amp
loop.
6. Effects Matrix
The matrix provides information regarding the current preset and parameter edit functions. In
Performance mode, the LEDs running down the left side of the Matrix provide a visual indication
of which effects are in use for the selected preset. While editing a preset, the LEDs indicate that
the Effect row is selected for editing.
7. Displays
The RP1000 has two sets of displays. The 8 character alpha-numeric display shows preset names,
bank names, and effects names while editing. The 2 character numeric display shows preset
numbers and effects parameters while editing and shows the note being tuned when the Tuner is
enabled.


