


6
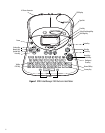
Figure 3
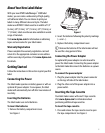
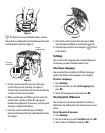
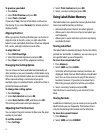
x The first time you use the label maker, remove
the protective cardboard insert from between the print
head and pinch roller. See Figure 4.
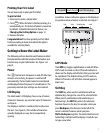
Figure 4
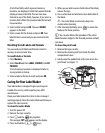
2. Set the cassette switch for the size of the tape
cassette that you are inserting. See Figure 4.
A notch in the cassette fits over the switch when the
cassette is in the correct position.
3. Make sure the tape and ribbon are taut across the
mouth of the cassette and that the tape passes
between the guideposts. If necessary, turn the spool
clockwise to tighten the ribbon.
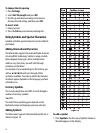
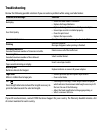
4. Insert the cassette with the tape and ribbon
positioned between the print head and pinch roller.
See Figure 5.
Figure 5
5. Press firmly until cassette clicks into place. Make
sure the tape and ribbon are positioned correctly.
6. Close the tape cassette cover and press to turn
on the power.
Settings
You can select the language and corresponding units
of measure you want the label maker to use.
Selecting a Language
You can select from a number of different language
options. By default, the language is set to English.
To select a language
1. Press Settings.
2. Use the arrow keys to select Set Language and
press OK.
3. Select the language you want and press OK.
Selecting Units of Measure
You can choose to show measurements in inches or
millimeters. By default, the units of measure are set to
inches.
To set the units of measure
1. Press Settings.
2. Use the arrow keys to select
Set Units
and press
OK
.
3. Select inches or millimeters and press OK.
= 6
= 9/12
= 19/24
Remove
Select tape
cassette size
cardboard insert
CLICK!
CLICK!