


14
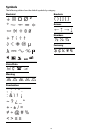
Creating Vertical Labels
You can choose to print
labels with the text
running vertically. Labels
with multiple lines of text
will print as multiple
columns of text.
To create a vertical label
1. Press .
2. Enter or select a length
for the label and press .
Select AUTO to have the length of the label
automatically set to fit the text.
Changing the Label Type
Once you create a label using one label type, you
can easily change the label type without losing
your data.
If the data from one label type will not fit in the
new label type, the text that will not fit is shaded
in the display.
Example: When you change from a multi-cell
label, such as a Patch Panel, to a single cell label,
such as General or Flag, each cell becomes a new
label. All blank cells are deleted.
When you change from a multi-cell label type
to another multi-cell label type, make sure the new
label type contains the same number of cells.
To change the label type
1. Press the hot key for the new label type.
2. Make any necessary adjustments to the settings
for the label type.
Changing the Label Settings
Once you create a specific label, you can change
the settings without starting all over again.
To change the label settings
1. Press .
2. Select Current label config. and press .
The settings for the particular label type
are displayed.
3. Make the necessary changes.
4. Press and then select Done (OK).
Printing Separator Lines
Between Cells
For multiple cell labels, such as Patch Panel,
Electrical Panel, Terminal Block, 110-Block, and
Module, you can choose to print a separator line
between each of the cells.
To print separator lines between cells
1. Create the type of multiple cell label you want.
2. Press .
3. Select Current label config. and press .
4. Select Separator lines and press .
5. Select On.
6. Press and then select Done (OK).
A line is printed between each cell.
Using Barcodes
The printer can generate Code 39 and Code 128
barcodes. You can add a barcode to the following
label types:
You can only print a barcode on 3/4” (19 mm) wide
labels. You can choose whether or not to print the
human-readable text, and you can serialize
barcodes.
The barcode prints horizontally along the label. You
can choose to print the human-readable text in
small print either underneath or above the
barcode. Optionally, you can add text before and
after the barcode.
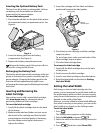
Adding a Barcode
The barcode text appears on the label in the
display just like any other text. However, if the
cursor is positioned within the barcode text,
Barcode and the type of barcode are displayed in
the Caption bar.
To add a barcode
1. Press + .
2. Select Barcode type and press .
3. Select the barcode type, and press .
4. Enter the text for the barcode within the
barcode on the display.
5. Press and then select Done (OK).
General Fixed
Wire Patch Panel
Flag Module
TFIHS