AMC-S402
6806800H60A AMC-S402 Installation and Use 8
e guides, apply equal and steady
7. Power on the system, if necessary. Refer to your system manual for instructions
e system. Once power is applied to the chassis, the
s a self-test that runs for approximately 10 seconds.
o
t
ions, warnings, and instructions
e
, you should remove
g the module handle to the half way
odule by pulling on the module handle.
e processes still running on the board.
Be sure to manually shut down applications or operating systems running on
the board prior to board removal.
6. Carefully pull the module from the chassis. If the card slot is to remain empty,
install a filler panel in the slot.
Installation
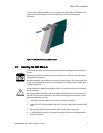
5. Taking care to keep the module aligned in th
pressure and slide the module in until the fingers of the module snap into the
internal AMC connector.
DO NOT FORCE THE BOARD INTO THE SLOT.
6. Push the Module Handle to the IN position.
on correctly powering on th
internal MMC controller run
Upon a successful power up self-test, the blue hot swap LED will blink and then
turn off, indicating that the module has been placed in operation.
2.8 Rem ving the AMC Module
The AMC-S402 AMC is hot-swappable and can be removed from the chassis withou
powering down the associated host carrier or chassis. This section describes the
recommended procedure for removing an AMC module.
Before you remove your module, please read all caut
!
Caution
present
ed in this section. Hot swap compliant modules may be removed while th
system is powered on. If the chassis is not hot swap compliant
power to the s
lot or system before removing the module.
To remove the AMC module, follow these steps:
1. Begin to remove your module by pullin
(HW) position. Do not remove the module immediately.
2. Powering down or removing a board before the operating system or other
software running on the board has been properly shut down may cause
corruption of data or file systems.
3. If your module is hot swap compliant and you are running fully functional hot
swap-aware software, unlatching this ejector lever will start the shutdown
process on the board. The software will slowly blink the blue hot swap LED
indicating the module is in the process of being de-activated.
4. Once the module has been de-activated, the blue LED will solidly illuminate.
Once this is done, you can extract the m
5. If your board or system is not running hot swap-aware software, the blue LED
may illuminate without regard to softwar


