


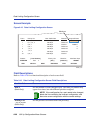


Rate Limiting Configuration Screen
9-42 802.1p Configuration Menu Screens
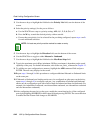
3. Use the arrow keys to highlight the field below the Priority List field, near the bottom of the
screen.
4. Select the priority setting(s) for the port as follows:
a. Use the SPACE bar to step to a priority setting: ALL, 0, 1, 2, 3, 4, 5, 6, or 7.
b. Press the M key to mark the desired priority with an asterisk.
c. If more than one priority is to be selected for the port being configured, repeat steps a and b
for each additional selection.
5. Use the arrow keys to highlight the Direction field, near the bottom of the screen.
6. Use the SPACE bar to toggle to either Inbound or Outbound.
7. Use the arrow keys to highlight the field below the Max Rate: kbps field.
8. Type in the maximum rate in Kbps (minimum: 50 Kbps, maximum is dependent on the speed
capability of the port). For further information, refer to the rate_limit_ command in Chapter 12.
9. To add the new port configuration to memory, highlight the ADD command field and press
ENTER. The new entry displays in the screen.
10.Repeat steps 1 through 9 of this procedure to configure additional Inbound or Outbound limits
on the same port.
11.If Inbound or Outbound rate limiting entries are to be configured on other ports on the device,
repeat steps 1 through 10 to configure each port. Any combination of Inbound and Outbound
entries may be configured per port with a limit of three for Inbound and three for Outbound. (For
example, two inbound/two outbound, one inbound/three outbound, two inbound/one outbound
and one inbound/one outbound.)
12.After configuring the entry(ies) on the ports, enable the screen function for all the configured
ports by highlighting DISABLED in the Feature field and pressing ENTER. The screen function
is enabled and the Feature field changes to ENABLED.
NOTE: At least one priority must be marked to create an entry.