


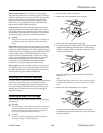


3. Move the paper-release lever to the single-sheet position.
Note:
If the
Data
and
Paper Out
lights flash, you may have moved
the paper-release lever before feeding the paper backward to the
paper-park position. Lower the paper-release lever to the
continuous-paper position and press the
Load/Eject
button;
then raise the paper-release lever to the single-sheet position.
4. Change the driver settings to match your paper source,
size, and type.
5. The printer is ready to print. When it receives data, it loads
a single sheet from the sheet feeder or manual feed slot.
Note:
The paper eject guides raise automatically when a single sheet
is loaded from the sheet feeder.
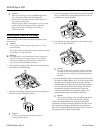
Switching to Continuous Paper
To switch from single sheets back to continuous paper,
follow the steps below:
1. If a single sheet is in the paper path, press the
Load/Eject
button to eject it.
2. Raise the paper-release lever to the continuous-paper
position.
Note:
If the
Data
and
Paper Out
lights flash, you may have moved
the paper-release lever before ejecting a sheet of paper. Raise the
paper-release lever to the single-sheet position and press the
Load/Eject
button; then lower the paper-release lever to the
continuous-paper position.
3. Lower the page eject guides.
4. Change the driver settings to match your paper source,
size, and type.
5. The printer is ready to print. When it receives data, it loads
continuous paper from the tractor feeder and begins to
print.
Paper Handling Problems
This section describes how to prevent paper jams and ensure
that paper feeds properly.
Paper jam problems
If paper jams inside the printer frequently, try the following:
❏
Use a higher quality paper that is suitable for ink jet
printers and is not too thin, too thick, or rough. For best
quality, use EPSON coated and high-quality glossy
papers. See “Printer Specifications” for paper
specifications.
❏
Fan the stack of paper before you load it.
❏
If you loaded plain paper, try turning the stack over.
The printable side should be facing down.
❏
Do not load too many sheets in the sheet feeder. See
“Printer Specifications” for the sheet feeder capacity.
Paper feeding problems
If paper does not feed properly, the most likely causes are:
❏
Paper is curled or folded. Use flat, undamaged paper.
❏
The paper is of poor quality; use a better quality paper.
❏
The paper is too thin or thick; see “Printer Specifications”
for paper size and type specifications.
❏
The paper was exposed to excess humidity. See “Printer
Specifications” for the required environmental conditions.
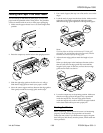
❏
The left edge guide is too tight or too loose; adjust it for
the size of the paper.
❏
The thickness adjustment lever is set incorrectly for the
media; see “Setting the Thickness Adjustment Lever.”
❏
Continuous paper may be in the paper path when you
print from the sheet feeder. Remove the continuous paper.
❏
The paper-release lever is set to the wrong position; see
“Switching Between Continuous Paper and Single Sheets.”
❏
Too many sheets are loaded in the sheet feeder. See
“Printer Specifications” for the sheet feeder capacity.
Printer Care
Cleaning the Print Heads
The printer periodically cleans its print heads automatically,
so normally you should not need to manually activate a
cleaning cycle. However, the ink nozzles in the print head
may become clogged occasionally and reduce the print
quality. If this happens, you can run a cleaning cycle to clear
the nozzles.
You can clean one or both print heads. Each cleaning cycle
takes about one minute. During the cleaning cycle, the
carriage moves back and forth and you can hear the printer
recharging the print heads. The
Pause
light flashes
throughout the cleaning cycle and then stays on when the
cycle is finished.
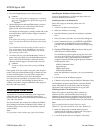
To clean the black print head:
1. Make sure the printer is on and press the
Pause
button.
2. Hold down the
Alt
button and press
LF/FF
. The cleaning
cycle begins.
3. Press the
Pause
button to resume printing.
EPSON Stylus 1500
EPSON Stylus 1500 - 16 1/96 Ink Jet Printers