


Epson PowerLite Cinema 200 Projector
4 - Epson PowerLite Cinema 200 Projector 1/04
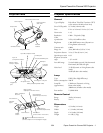
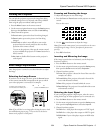
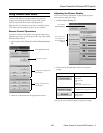
Positioning the Projector
You can install the projector for these viewing setups:
When projecting from a rear or overhead position, orient the
image by selecting the correct Projection option (see page 5).
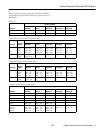
Image Size and Projection Distance
The maximum size of the image is determined by the distance
from the projector’s lens to the screen. Depending on how you
use the Zoom and other settings, the actual size may be smaller.
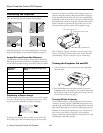
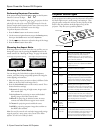
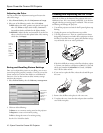
Projecting a Square Image
For best image quality, place the projector level and at a height
so its lens is between the top and bottom of the screen. Then
use the vertical lens shift knob to position the image.
If you place the projector above or below screen level, you’ll
have to tilt it up or down to aim the image at the screen; this
distorts (or “keystones”) the shape of the image, but you can
correct it using the projector’s Keystone function (see page 6).
If you place the projector off to the side, aim it straight ahead
(rather than at the center of the screen), then use the horizontal
lens shift knob to center the image. Do not place the projector
farther to the left or right than the edge of the screen, or you
will not be able to project a square (or rectangular) image.
Tip: To display a test pattern to help you center the image on the
screen, press the Pattern button on the remote control, then select
Cross-hatching. You can use the feet to correct a tilted image.
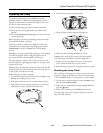
Turning the Projector On and Off
1. Connect the power cord to the projector and a grounded
electrical outlet.
2. Press the
On button on the remote control, or press the
P
Power button on the projector. The projector takes about
30 seconds to warm up. If you don’t see an image, you may
need to select its source (see page 5).[]
Turning Off the Projector
To turn off the projector, press the Off button on the remote
control (or press the projector’s P
Power button twice). Let it
cool about 30 seconds while the Ppower light flashes. Once the
light stops flashing and stays on, you can unplug the projector.
Caution: Turn the projector off when not in use. Continuous 24-
hour-a-day use may reduce its overall life. Never unplug the
projector without pressing the Off button and letting it cool, or you
could damage it and reduce lamp life.
Projection
distance
Maximum diagonal image size
(16:9)
2.9 feet 30 inches (26 × 14 inches)
3.9 feet 40 inches (34 × 19 inches)
5.9 feet 60 inches (52 × 29 inches)
7.9 feet 80 inches (69 × 39 inches)
9.9 feet 100 inches (87 × 49 inches)
19.9 feet 200 inches (174 × 98 inches)
29.9 feet 300 inches (261 × 147 inches)
Front/Ceiling
Front Rear
Rear/Ceiling
Adjustable feet
Vertical lens shift knob
Horizontal lens shift knob