


Epson PowerLite Cinema 200 Projector
1/04 Epson PowerLite Cinema 200 Projector - 7
Troubleshooting
You cannot turn on the projector.
❏ Make sure the power cord is connected, then wait a moment
for the P power light to turn orange before pressing the
P
Power button.
❏ If you’ve set the
Key Lock (see page 5), the control panel
buttons are disabled; you must use the remote control to
turn on the projector.
❏ If you’ve set the
Child Lock, use the remote control or press
and hold the P
Power button on the projector for at least
3 seconds to turn it on (see page 5).
No picture appears on the screen or you
see the message
No Signal displayed.
❏ Press the Source button on the projector or one of the
Source buttons on the remote control to select the correct
input source. Allow a few seconds for the projector to sync
up after pressing the button.
❏ Press the
Blank button on the remote control to make sure
the picture hasn’t been turned off temporarily.
❏ Check that the P power light is green, not flashing, and the
lens cover is off.
❏ The projector may be in standby mode. If the P power light
is orange, press the P
Power button to turn the projector
back on.
❏ Make sure your video equipment is turned on.
❏ Make sure your cable(s) are connected correctly.
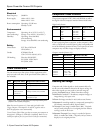
❏ Make sure the output signal from your video equipment is in
a compatible format (see page 2).
You’re using a computer and no picture
appears on the screen.
First, make sure the output signal from your computer is in a
compatible format (see page 2). If you still see no picture, check
additional computer settings as described below.
If you’re using Windows:
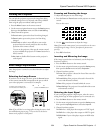
❏ Press the function key that lets you display on an external
monitor. It’s often labeled with an icon such as , but it
may also be labeled
CRT/LCD. You may have to hold down
the
Fn key while pressing it. Check your laptop’s manual or
online help.
On most systems, the key lets you toggle between the
LCD screen and the projector, or display on both at the
same time. Allow a few seconds for the projector to sync up
after pressing the key.
❏ If the function key doesn’t let you display simultaneously on
both screens, you might need to use the Display utility in the
Windows Control Panel to make sure that both the LCD
screen and external monitor port are enabled. From the
Control Panel, open the
Display utility. In the Display
Properties dialog box, click the
Settings tab, then click
Advanced. The method for adjusting the setting varies from
computer to computer; you may need to click a
Monitor
tab, then make sure the external Monitor port is set as your
primary display or enabled. See your computer manual or
online help for details.
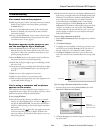
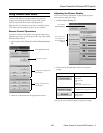
If you’re using a Macintosh with OS X:
1. Select
System Preferences from the Apple menu and click
Displays.
2. Click
Detect Displays.
3. To display the entire desktop on both your projector screen
and LCD screen, click the
Arrange tab. (If you don’t see
this tab, make sure it isn’t hidden by another window.)
4. Click
Mirror Displays in the lower corner of the screen.
One of the monitor icons automatically moves on top of the
other.
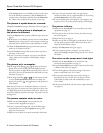
If you’re using a Macintosh with OS 9.x or earlier:
1. From the Apple menu, select
Control Panels, then click
Monitors or Monitors and Sound.
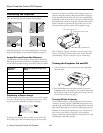
2. Click the
Arrange icon, and then drag one monitor icon on
top of the other.
®
Click here
Click here
Drag one
monitor icon on
top of the other