


EPSON Stylus Scan 2500
11 -
EPSON Stylus Scan 2500
9/99
5. Click the
Print Head Alignment
icon. Follow the
instructions on the screen to print a test page and select the
correct alignment.
Cleaning the EPSON Stylus Scan
To keep your EPSON Stylus Scan operating at its best, clean
it several times a year. Follow these steps:
1. Turn the EPSON Stylus Scan off, unplug the power cord,
and disconnect the cable.
Warning:
Be careful not to touch the internal gears.
2. Remove all paper from the sheet feeder.
3. Use a soft brush to clean loose dust and dirt.
4. Use a soft, clean cloth and mild detergent to clean the outer
case and inside of the sheet feeder. Be careful not to soak the
cloth—just dampen it. Keep the document and
maintenance covers closed to prevent moisture from getting
inside.
5. Clean the document table with a soft, dry cloth, or with a
blower brush.
6. If ink leaks inside the EPSON Stylus Scan, wipe it away
with a damp cloth.
Caution:
Never use alcohol or thinners, and never spray lubricants inside
the EPSON Stylus Scan. You could damage the printer
mechanisms.
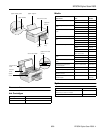
Transporting the EPSON Stylus Scan
Caution:
To avoid damage, always leave the ink cartridges installed when
transporting the EPSON Stylus Scan. Also, remember to lock the
print head and the transportation lock.
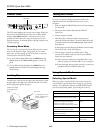
For short moves, you can just pick up the EPSON Stylus Scan
and set it down. For longer moves, you need to repack it in its
original box and lock the print head and transportation lock.
Follow these steps:
1. Turn on the EPSON Stylus Scan and wait until the print
head locks in position. Then turn off the EPSON Stylus
Scan.
2. Unplug the power cord, and then disconnect the interface
cable.
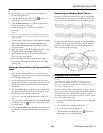
3. Open the document and maintenance covers.
4. Push the transportation lock right to lock the scanner
carriage.
5. Close the maintenance and document covers.
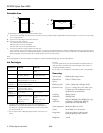
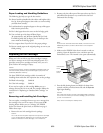
6. Remove all paper from the sheet feeder, and then remove
the paper support.
7. Push in the output tray extension.
Caution:
Be sure to remove the tape used in step 8 before printing.
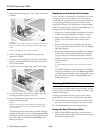
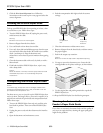
8. Use tape to secure the document cover. Secure the ink
cartridge holder to the printer with tape, as shown below.
9. Use the original box and packing materials to repack the
EPSON Stylus Scan.
10. Keep the EPSON Stylus Scan level during transport.
Cleaning the Automatic Document
Feeder’s Paper Path Guide
If you have an automatic document feeder and the quality of
your scans or copies declines, cleaning the paper path guide
might fix the problem.
Push in the
output tray
extension.
Lock the
transportation
lock.
Use tape here.