


EPSON Stylus Scan 2500
7 -
EPSON Stylus Scan 2500
9/99
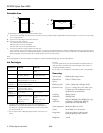
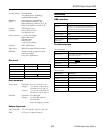
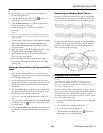
Control Panel
The LCD panel displays the current copy settings. When you
first turn on the EPSON Stylus Scan, you see these default
settings:
100% B&W Normal 1
. This means you’re set to
produce one black and white copy, of the same size as the
original document, at Normal quality (360 dpi resolution for
everyday copying).
Accessing Menu Mode
You can use the control panel’s Menu Mode to print a status
sheet, set the bottom margin, change from U.S. to metric
paper sizes, set the language on the LCD panel, or reset the
control panel to the factory defaults.
❏ To access Menu Mode, hold down the
B&W/Color
and
Quality
buttons until
Menu Mode
appears in the LCD
panel.
❏ To exit Menu Mode, hold down the
B&W/Color
and
Quality
buttons until the LCD panel displays the copy
mode settings.
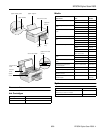
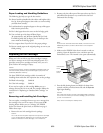
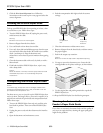
Loading Paper
To load paper, slide out the left edge guide and place the stack
of paper against the right side of the sheet feeder. Then slide
the left edge guide against the paper.
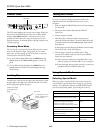
Testing the Printer
You can run a printer check to determine whether the
problem comes from the EPSON Stylus Scan
or your
computer.
1. Make sure both the EPSON Stylus Scan and your computer
are turned off.
2. Disconnect the interface cable from the EPSON
Stylus Scan.
3. Make sure paper is loaded.
4. Hold down the
E load/eject button, then press and
release the
POperate button. Continue holding down the
E load/eject button until the
Operate
light starts to flash,
then release it.
A check page is printed, showing the ROM version number,
ink counter, and a nozzle check pattern.
5. After the page is printed, turn off the power. Then
reconnect the interface cable and turn on your EPSON
Stylus Scan and computer.
❏ If the results are satisfactory, the problem lies in your
software settings, the interface cable, or your computer.
❏ If the check page does not print correctly, you may have
a problem with your EPSON Stylus Scan.
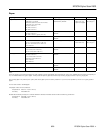
Using Special Media
Selecting Special Media
When you print on special media, you need to choose the
correct Media Type and Paper Size settings in your printer
software. The table below lists the available EPSON media
and the corresponding Media Type setting for each one.
Copy
Stop/Clear
CopiesQualityB&W/ColorReduce/Enlarge
Scan
Error
Set
ItemReturnHold for Menu
Darker/LighterPaper Size
Operate
LCD panel
Slide the left edge
guide against the
paper.
If the paper has a cut
corner, make sure you
load it as shown.
Cut corner
Media name Media Type setting
Plain paper sheets or envelopes Plain paper
EPSON 360 dpi Ink Jet Paper
EPSON Iron-On Cool Peel Transfer Paper
360 dpi Ink Jet Paper
EPSON High Quality Ink Jet Paper
EPSON Photo Quality Ink Jet Paper
EPSON Photo Quality Ink Jet Cards
EPSON Photo Quality Self Adhesive Sheets
Photo Quality Ink Jet
Paper
EPSON Photo Paper
EPSON Photo Quality Glossy Paper
Photo Paper
EPSON Photo Quality Glossy Film
EPSON Photo Stickers
Photo Quality Glossy Film
EPSON Ink Jet Transparencies Ink Jet Transparencies
EPSON Matte Paper–Heavyweight Matte Paper–
Heavyweight