


Epson PowerLite Cinema 500 Projector
2/04 Epson PowerLite Cinema 500 Projector - 3
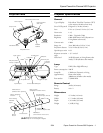
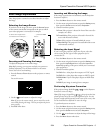
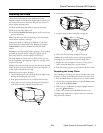
If you place the projector off to the side, aim it straight ahead
(rather than at the center of the screen), then use the horizontal
lens shift knob to center the image. Do not place the projector
farther to the left or right than the edge of the screen, or you
will not be able to project a square (or rectangular) image.
Tip: You can display a test pattern to help you center the image on
the screen. Press the Pattern button on the remote control, then
select Cross-hatching. You can use the feet to correct the angle of
the image if it’s tilted.
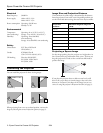
Cable Connections
You can connect up to five pieces of video equipment to the
projector, using the ports listed below (cables are not included):
* For video, select YCbCr, YPbPr, or RGB-Video as the Input Signal
setting in the projector’s menu system (see page 5). For a computer
connection, select RGB.
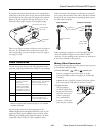
For best results, connect your video equipment to the
HDMI (High-Definition Multimedia Interface) port. If your
equipment doesn’t support HDMI, connect it to one of the
following ports (highest quality listed first): Input A or B (for
component video), S-Video, or Video (composite video).
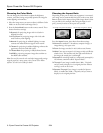
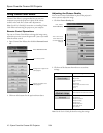
When connecting video equipment to the Input A or Input B
port, connect the component video cable to the three terminals
on the left. Be sure to match the corresponding colors between
the cable and the terminals.
When connecting a computer, use a VGA-to-BNC monitor
cable, and attach RCA adapters to each of the five BNC
connectors. Use the markings on the connectors to match them
to the correct terminals on the projector.
Making Other Connections
Depending on how you plan to use the projector, you may need
to connect these additional cables:
❏ Control (RS-232C), USB, or network port
Connect a computer to one of these ports to use the
Cinema Color Editor software (see page 10). A USB cable
is included.
Caution: Be sure to install the Cinema Color Editor software
before connecting the USB cable (see the User’s Guide).
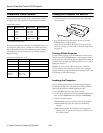
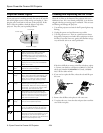
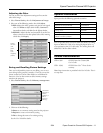
❏ Trigger out port
This port outputs a
12-volt DC signal when
the projector is turned on,
and can be used to raise
or lower a projection
screen automatically.
Connect a 3.5-mm mini
jack to the port, as shown.
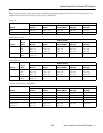
Port Required Cable Supported video formats
Video RCA video cable Analog TV (NTSC, PAL, SECAM)
S-Video S-video cable Analog TV (NTSC, PAL, SECAM)
Input A* For video, use a 3-
connector component
video cable.
For a computer, use a 5-
connector VGA-to-BNC
monitor cable and attach
RCA adapters to each of
the five BNC connectors.
Digital TV (SDTV and HDTV)
Analog TV (NTSC, PAL, SECAM)
Various computer monitor
formats (see table on page 4)
Input B* Same as Input A Same as Input A
HDMI HDMI cable Digital TV (SDTV and HDTV)
Various computer monitor
formats (see table on page 4)
Adjustable
feet
Vertical lens shift knob
Horizontal lens
shift knob
Component video
cable
VGA-to-BNC
monitor cable
RCA
adapters
Video connection: Computer connection:
Projector’s
Input A or B port