


Epson PowerLite Cinema 500 Projector
2/04 Epson PowerLite Cinema 500 Projector - 5
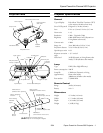
Basic Image Adjustments
Once the projector is turned on, use these functions to adjust
the image.
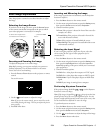
Selecting the Image Source
If you don’t see the image you want, press the Source button
on the remote control that corresponds to the port to which
your video equipment is connected. For example:
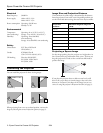
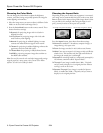
Focusing and Zooming the Image
To adjust the sharpness or size of the image:
Note: Before starting, you may want to display a test pattern to
facilitate adjustment. Press the Pattern button on the remote
control, then select Cross-hatching.
1. Press the
Focus or Zoom button on the projector or remote
control.
You see this screen:
2. Use the arrow buttons to adjust the image.
Note: If you use the remote control, you can stand close to the
screen while focusing the image. This lets you adjust the picture
more precisely.
3. Press
ESC when done.
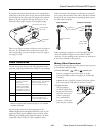
Inverting and Mirroring the Image
If the image is upside-down or backwards, use the Projection
function to adjust it:
1. Press the
Menu button on the remote control.
2. Use the menu navigation buttons to open the
Setting menu,
then open the
Screen menu and select Projection.
3. Choose from these options:
❏
Front if the projector is located in front of the screen (for
example, on a table).
❏
Front/Ceiling if the projector is located in front of the
screen and mounted overhead.
❏
Rear if the projector is located behind the screen.
❏
Rear/Ceiling if the projector is located behind the screen
and mounted overhead.
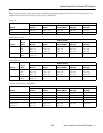
Selecting the Input Signal
If you’re using the projector’s Input A or B port, select the
correct setting for the type of video equipment you’ve
connected to it:
1. Press the
Menu button on the remote control.
2. Use the menu navigation buttons to open the
Setting menu,
then open the
Input Signal menu and select Input A or
Input B (depending on the port to which you’ve connected
your equipment).
3. Choose from these options:
❏
YCbCr for a video player that outputs an NTSC signal.
❏
YPbPr for a video player that outputs an HDTV signal.
❏
RGB-Video if your video player outputs an RGB video
signal.
❏
RGB if your image is coming from a computer.
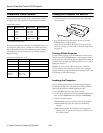
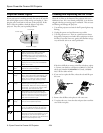
Performing Keystone Correction
If the projected image looks like or , use the Keystone
function to correct its shape.
Note: If the image is shaped like or , the projector has been
placed off to the side of the screen and angled toward it. Face the
projector straight ahead (instead of at the center of the screen), then
use the horizontal lens shift knob to center the image.
To perform keystone correction:
1. Press the
Menu button on the remote control.
2. Use the menu navigation buttons to open the
Setting menu,
then open the
Screen menu and select Keystone.
3. Use the arrow buttons to adjust the shape of the image.
4. Press the
Menu button when done.
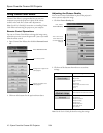
To select the image source
connected to the Video port . . .
...press the Video
button