


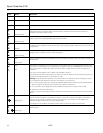


Epson PowerLite 6110i
4 12/07
Turning On the Projector
Make sure your projector and other equipment are set up and
connected correctly. Then turn on your projector, as described
below.
If you turn on your connected computer or video equipment
before starting the projector, the projector automatically
detects and displays the image source. If you turn on the
projector first, or have multiple pieces of equipment
connected, you may have to select the image source manually.
See “Adjusting the Image and Presentation” on page 6.
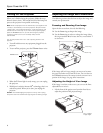
Follow these steps to plug in and turn on the projector:
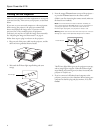
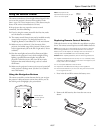
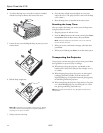
1. Plug one end of the power cable into the projector, and the
other end into a grounded electrical outlet.
2. Wait until the PPower light stops flashing and turns
orange.
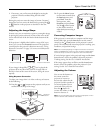
3. Press the orange P
Power button on top of the projector—
or press the P
Power button on the remote control.
(If this is your first time using the remote control, make sure
the batteries are installed.)
Note: If the Direct Power On feature has been enabled, you
don’t need to press the P Power button to turn the projector on.
Just plug the projector into an electrical outlet. When the
P Power light stays green, the projector is ready to use.
Warning: Never look into the lens when the lamp is on. This can
damage your eyes, and is especially dangerous for children.
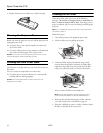
The PPower light flashes green as the projector warms up,
and an image begins to appear. When the PPower light
stops flashing and remains green (in about 20 seconds) the
projector is ready for use.
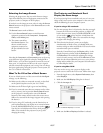
4. If you’ve connected a Windows-based computer to the
projector, you may see a New Hardware Wizard saying your
computer has found a plug-and-play monitor; if so, click
Cancel.
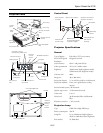
Power light
Power button