


Printing From Start to Finish
18
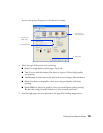
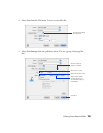
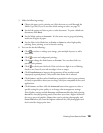
5. Make the following settings:
■
Choose the paper you’re printing on (click the arrow to scroll through the
Media Type
list). If you’re not sure which setting to select, see page 22.
■
Set the Ink option to
Color
to print a color document. To print a black text
document, click
Black
.
■
Set the Mode option to
Automatic
. It’s the easiest way to get good printing
results on all types of paper.
■
Set the slider in the Mode box to
Quality
or
Speed
to select high-quality
printing, faster printing, or an in-between setting.
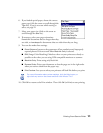
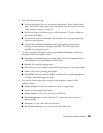
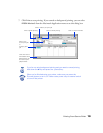
6. You can also do the following:
■
Click to reduce or enlarge your image, print multiple layouts, or add a
watermark.
■
Click to turn on background printing.
■
Click to change the
Print
button to
Preview
. You can then click it to
preview your printout.
■
Click to check your ink levels. If the red
b error light is on or flashing,
check to see if one of your ink cartridges is low or empty.
■
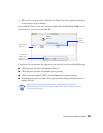
Click
PhotoEnhance
to improve the appearance of low-resolution and
improperly exposed photos. Only works when
Color
ink is selected.
■
Click
Custom
, and then select
ColorSync
to match the colors in your printout
as closely as possible to those you see using ColorSync-compatible devices and
applications.
■
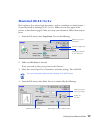
Click
Custom
, and then click the
Advanced
button that appears to select a
specific setting for print quality or to change color management settings.
Print Quality settings include
Economy
and
Economy Plus
for draft printing,
Normal
for everyday printing needs,
Fine
when you want a higher resolution
for text or text and graphics,
Photo
when you’re printing photographs, and
Photo RPM
when you want the highest resolution for your photographs and
don’t mind the longer print time.