


6
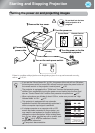
Part Names and Functions
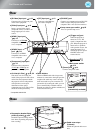
Front / Top
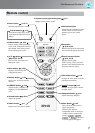
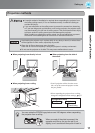
Control panel
Buttons with no explanation function in the same way as the corresponding buttons on the remote
control. Refer to "Remote control" for further details on these buttons.
• Front adjustable feet p.17
Extend to adjust the projection angle
so that the projector is horizontal
when placed on a desk top.
• Control panel (side)
See below
• Air exhaust vent
A discharge outlet for the air
which cools the inside of the
projector.
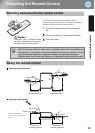
• Remote control light-
receiving area p.13
Receives signals from the
remote control.
• Vertical lens adjustment
dial p.16
Turn the dial to move the
position of the projection
image up or down.
• Lens cover
When not using the projector, attach this to the
lens to protect the lens from damage and dirt.
•
H
or
i
zon
t
a
l
l
ens a
dj
us
t
men
t
dial p.16
Turn the dial to move the position of the
projection image to the left or right.
Do not touch the exhaust vent
immediately after projecting, or
while projecting, since it
becomes hot.
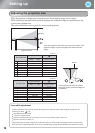
• Focus ring p.16
Adjusts the image focus.
• Zoom ring p.16
Adjusts the image size.
• Control panel (top)
See below
• Remote control light-
receiving area p.13
Receives signals from the
remote control.
• Lamp cover p.52
Open this cover when replacing the
lamp inside.
• Projection lens
Projects images from here.
• Warning indicator p.41
Flashes or lights in different colors to
indicate problems with the projector.
• Power button
p.14, 15
• button
p.18, 20, 22, 26
• Enter/Line menu button
p.18, 24, 26
• Menu button p.26
• Source button p.15
Displays a list of input
sources and switches to
your desired input source.
• Esc button
p.18, 20
,
26
Top control panel Side control panel