


Fine-Tuning the Projector 47
Blackboard
: For projecting accurate colors on a green
chalkboard (adjusts the white point).
Customized: For manual color adjustment. (See below.)
■ Brightness
Lightens or darkens the overall image.
■ Contrast
Adjusts the difference between light and dark areas.
■ Color Saturation (video only)
Adjusts the color depth of the image.
■ Tint (video only)
Adjusts the balance of green to magenta in the image
(available only for component video or NTSC signals).
■ Sharpness
Adjusts the sharpness of the image.
■ Color Adjustment
Adjusts the color values. For Customized color mode, select
RGBCMY to adjust individual red, green, blue, cyan,
magenta, and yellow hue and saturation values. For other
color modes, RGB may be selected to adjust red, green, and
blue hue and saturation values. (Not available if
sRGB is
selected as the Color Mode setting.)
■ ABS Color Temp.
Sets a color temperature between 5000 and 10000 °K. (Not
available if
sRGB is selected as the Color Mode setting.)
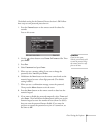
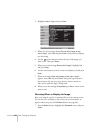
Adjusting Signal Settings
Although the projector normally detects and optimizes the input
signal automatically, you can use the Signal menu to make manual
adjustments. In addition to changing the position of the projected
image, you can correct tracking and sync for computer images, or
change the aspect ratio to widescreen format for video images.
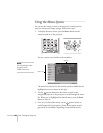
1. Press the
Menu button and select the Signal menu.
note
The Brightness setting
changes the opacity of the
projector’s LCD panels. You
can also change the lamp’s
brightness. Select
Brightness Control in the
Setting menu, then choose
High or Low (the default
setting is High).
note
You can also use the remote
control’s
Auto button to
automatically reset the
projector’s tracking, sync,
resolution, and position
settings. See page 23 for
details.