


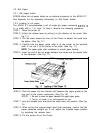
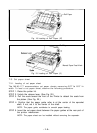


8. Gap Adjustment
The adjustment of a gap between the head nose and the platen is used to
adjust the printing pressure as well as to suit paper of a different thickness.
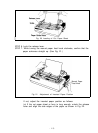
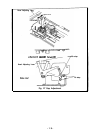
(1) Move the head adjusting lever (located on the left frame of the Printer) for-
ward or backward to adjust the gap between the head nose and the platen.
(See Fig. 27.)
Forward: To widen gap.
Backward: To narrow gap.
NOTE: With a thick paper, be sure to widen this gap.
(2) Adjust the position of the head adjusting lever according to the type of
paper to be used.
Paper
Position of adjusting lever
Single-leaf paper
Set the lever to the 4th step.
Carbon paper sheets
Set the lever to the 7th step.
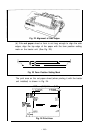
(3) Should printed characters become faint due to the use of the Printer for an
extended period, move the head adjusting lever backward (in
the@direc-
tion) by one step. (See Fig. 27.)
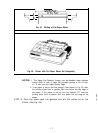
(4) When a set of carbon paper sheets is used, be sure that no characters are
printed within the area two lines each above and below the perforation.
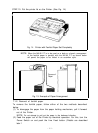
9. Power Connection
The EPSON MX-80 F/T Dot Matrix Printer is capable of operating on the follow-
ing three types of AC power.
(1) 115V AC, 60Hz
(2) 220V AC, 50Hz
(3) 240V AC, 50Hz
Before connecting the MX-80 F/T to a power source, make certain of the pri-
mary AC rating from the label located on the chassis at the rear of the Printer.
After connection of the Printer to the proper power source and upon applica-
tion of power to the Printer, “Initialization” will take place in the Printer with
the effects described in “OPERATION” 5.4. If your MX-80 F/T has a primary AC
rating different from the available power source, do not attempt to operate the
Printer. Please obtain a replacement unit with the correct AC rating from the
store where you purchased the MX-80 F/T.
-18-