XDT User’s Manual
14
dent relays corresponding to the HI and LO alarms. The relay contacts are rated at 10A 250VAC
or 30VDC, instruments for use in division 2 Hazardous Areas have hermetically sealed relays
rated at 3A 125VAC. Use wiring appropriate for the voltage and current that will be switched by
the relays. Also see section 1.3 for EMI considerations. Keep in mind that the relay polarity is
programmable thus wiring should be designed to provide a fail safe operation in case of power
failure. See section 3.4.4.2. Also note that while viewing the dewpoint, the display will flash HI
and/or LO as necessary to indicate that the corresponding alarm relay is de-energized. Specially
ordered instruments may have a third alarm, refer to the supplied addendum for relay contact rat-
ing, pinouts and user interface issues.
3.3.2.4 Interfacing to the Analog Output
The optional Analog Output may be a voltage or current, depending on the ordered configuration.
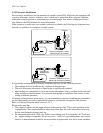
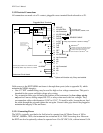
The Analog Output signal is provided on the P1 connector, when wiring please observe the polar-
ity indications. The positive terminal is on pin #7 it is labeled “A-OUT” and the negative is on pin
#8 it is labeled “A-RET”. The ground of the Analog Output is connected to the frame (AC power)
ground but it is isolated from the sensor ground, see section 3.1.1.
Instruments ordered with Voltage output, are configured at the factory with appropriate resistors
across the current loop output such that when operated in the 0-24mA mode they produce the
desired voltage.
The current loop is capable of driving loads from 0Ω to 500Ω and the user may select to operate it
as 0-24mA or as 4-20mA (refer to 3.4.5-6). The output is linearly proportional to the selected
engineering units. The output may be scaled such that it spans only a portion of the full range of
the sensor, this feature may be useful in cases where a higher resolution output is required over a
narrow dewpoint range, or vise versa. To verify or change the current loop configuration and scal-
ing follow the instructions in the set-up mode section 3.4.5 - 6,7,8&9.
After hooking up the current loop output, it can be forced to its low, mid and high points by fol-
lowing the instructions in section 3.4.5 - 7. This procedure may be helpful in testing the connec-
tion and setting-up the termination equipment.


