


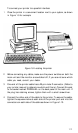

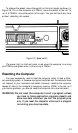
You can turn on your computer with or without a system diskette in the
top disk drive. For now, leave the drive empty. When you are ready to turn
on the computer, press the power switch at the upper-right corner once. The
power indicator on the front panel lights up and the cooling fan inside the
main unit starts. After a few seconds, the computer begins to perform an
internal test.
If you cannot see the screen display clearly, use the controls on your
monitor to adjust the brightness and contrast until characters on the screen
are clear and bright. If the display is not stable, check your monitor’s hori-
zontal and vertical hold controls.
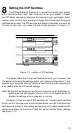
Initial setup procedure
If this is the first time your Equity I+ has been used, you need to use the
diagnostics diskette to perform an initial setup. This is a simple procedure
which you must do at least once. You may need to do it again if you change
your system time or date or serial port options. See your Diagnostics manual
for instructions.
Initial screen display
After the computer completes its self test, a message tells you how much
RAM (random access memory) is available, for example:
640KB OK
Then the following message displays:
Non-system disk or disk error
Insert system diskette in drive A:
and strike any key when ready.
This tells you that the computer can now load an operating system from a
diskette in the top drive. The Equity I+ needs a disk operating system (DOS)
to function. It comes with MS-DOS version 3.2. If you want to use another
operating system, consult your Epson dealer.
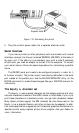
To load an operating system, insert the system diskette you want to use
(see “Inserting and removing diskettes” in Chapter 2). Refer to your
MS-DOS (or other operating system) manual for details on how to use the
system.
Note:
Use only a backup copy of the system diskette for daily use and keep
the original in a safe place. See your MS-DOS manual to find out
how to make a backup copy.
1-19