Pressure Systems, Inc. 98RK-1 & 9816 User’s Manual©
Page 114 www.PressureSystems.com
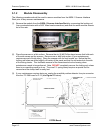
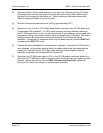
(4) With one hand holding the transducer/cal-valve housing, remove the four (4) 3/32" Allen-head
screws that secure the module to the scanner chassis top guide rail. Cut the nylon tie wrap that
secures ribbon cable from the PC-206 board to the chassis. The chassis itself acts as the
mounting plate for the scanner. When the four (4) screws are removed, the PC-206
Amplifier/MUX PCB assembly is exposed. Underneath the PC-206 PCB are the DH-200
transducers. Care must be taken that the loosened transducer/cal-valve housing does not fall
down on the scanner locking rod.
(5) When all four (4) screws have been removed, shift the transducer/cal-valve housing to the side
away from the chassis locking rod. Prop the transducer/cal-valve housing so that the ribbon
cable from the PC-206 amplifier/multiplexer board is toward the back of the module. Care must
be taken to ensure that the nylon tubes do not become crimped.
(6) Gently lift the transducer housing up and off the transducers and the amplifier/multiplexer board.
(7) You now have direct access to the electronic components in the scanner. Replace the bad
component. Remember that the amplifier/multiplexer board is sensitive to static discharge.
(8) Replace the transducer/cal-valve and its housing exactly opposite the removal steps. For
example, replace the transducer housing over the transducers and the amplifier/multiplexer
board. With one hand holding the transducer/cal-valve housing, place the scanner up-right.
Shift the transducer/cal-valve housing back into the scanner chassis. Align the Allen-head
screws with the same holes from which they were removed, and tighten. Make sure not to pinch
the electrical ribbon cable. Secure the ribbon cable to the top guide rail with a nylon tie.
(9) Replace the side panel(s) and test your scanner to ensure proper operation.
5.1.3 Electronic Circuit Board Replacement
Please refer to Table 5.1 for a summary of applicable electronic circuit boards for your
NetScanner
™
System Intelligent Pressure Scanner.
5.1.3.1 PC-206 Amplifier/Multiplexer Board
The following procedures should be used for replacement of the PC-206 Amplifier/Multiplexer
Board. Use the tools and follow the general precautions described in Section 5.1.1.
(1) Remove the scanner module from the 98RK-1 and disassemble it as described in
Section 5.1.2. Remove the transducer/cal-valve housing from the top chassis rail.
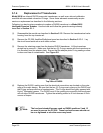
Carefully remove the ribbon cable from connector P1 of the PC-206 board. Note the
orientation of the PC-206 relative to the rest of the module to ensure the new PC-206 is
installed in the same position. See Figure 5.4, next page.
(2) Remove the two (2) Phillips-head screws securing the PC-206 board to the DH200
transducers. Carefully disconnect the PC-206 board from the DH200's by slowly working
the board off the DH200s, starting at one end and moving down the length of the board.
It is important that the gold pins are not bent when removing the board.


