


© 2009 Extron Electronics. All rights reserved.
Extron USA - West
Headquarters
+800.633.9876
Inside USA / Canada Only
+1.714.491.1500
+1.714.491.1517 FAX
Extron USA - East
+800.633.9876
Inside USA / Canada Only
+1.919.863.1794
+1.919.863.1797 FAX
Extron Europe
+800.3987.6673
Inside Europe Only
+31.33.453.4040
+31.33.453.4050 FAX
Extron Asia
+800.7339.8766
Inside Asia Only
+65.6383.4400
+65.6383.4664 FAX
Extron Japan
+81.3.3511.7655
+81.3.3511.7656 FAX
Extron China
+400.883.1568
Inside China Only
+86.21.3760.1568
+86.21.3760.1566 FAX
Extron Middle East
+971.4.2991800
+971.4.2991880 FAX
Back cover:
installation checklist
and contact
information
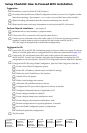
Setup Checklist: How to Proceed With Installation
Preparation
Familiarize yourself with the IPL 250's features.
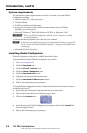
Download and install Extron Global Configurator software (version 3.0 or higher) and the
latest driver package. (See chapter 1, www.extron.com, and the Extron software disk.)
Obtain IP setting information from the network administrator for the IPL.
Obtain model names and setup information for devices that the IPL will control.
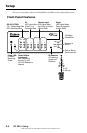
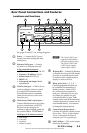
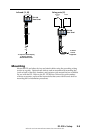
Perform Physical Installation — see chapter 2
Mount the unit to a rack, furniture, or projector mount.
Connect the IPL to a network (LAN) and the other devices.
Connect power cords and turn on the audio/video (A/V) devices (projectors, monitors,
speakers), control products (such as projector lifts and screen controls), the IPL,
a PC (for setup) or touchpanel (for control after configuration).
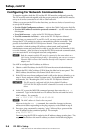
Configure the IPL
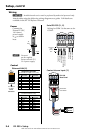
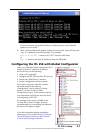
Connect the PC to the IPL 250 via Ethernet patch or crossover cable (see chapter 2) and use
Telnet or a similar application to configure the IPL for network communication (page 2-6).
Connect any TLP touchpanels that will be part of the system to the same network as
the PC and IPL. Create a user interface layout for the touchpanels and upload the GUI
configuration to each touchpanel. (See the GUI Configurator software help file for details.)
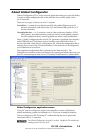
Configure the IPL 250 using Global Configurator. (See the Global Configurator Help file.)
Create a new Global Configurator project.
Set the IPL’s IP address, subnet mask, and other IP settings.
Define the unit’s GlobalViewer Tree location.
Add the IPL to the project.
Define e-mail settings and contacts.
Add serial, IR, and Ethernet device drivers.
Configure the IPL’s ports and assign device drivers as needed.
Configure touchpanel buttons, if applicable, in GC.
Create a display shutdown schedule.
Create a display lamp hours notification e-mail.
Create a display disconnection notification e-mail.
Perform configurations for special applications, if needed.
Save the Global Configurator project/configuration.
Build and upload the configuration.
Test the system.