


3-19MVX 44 / 48 / 84 / 88 VGA Matrix Switchers • Operation
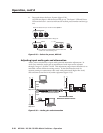
In Audio Setup mode, whichever input is selected for adjustment is automatically
tied to output 1. You can connect a VU meter or an audio system to output 1 to
measure or monitor the audio while you perform adjustments.
There are two ways to measure the audio level during audio setup:
• Monitor the input audio level indicator (Power LED) on the front panel.
• Connect a VU meter to output 1 and, if necessary, temporarily set the
output 1 level to the consumer (-10 dBV) level (see the Audio output level SIS
commands in chapter 4, Remote Operation).
The input audio gain or attenuation can be adjusted from the front panel or by
using Extron’s Windows-based control program or the SIS.
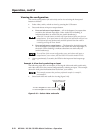
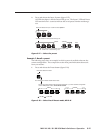
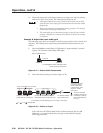
1. Apply audio signals to all inputs to be adjusted.
2. Press and hold the Audio Setup (I/O) button until the Audio Setup LED
lights. Release the Audio Setup button.
3. Press and release an input button to select an input. The selected input can be
adjusted and is tied to output 1 for measurement or monitoring.
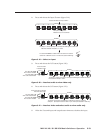
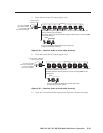
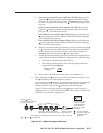
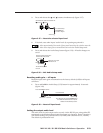
a. The Output 1 through Output 3 LEDs display the approximate audio
gain or attenuation for the selected input. The +dB and –dB LEDs
display the polarity (+ [gain] or – [attenuation]).
• Each Output 1 through Output 3 LED indicates a range of 6 dB
when lit:
°
Output 1 LED off = 0 dB to 5 dB
°
Output 1 LED lit = 6 dB to 11 dB
°
Output 1 and 2 LED lit = 12 dB to 17 dB
°
Output 1 through Output 3 LEDs lit = 18 dB
• The +dB LED on indicates a positive (gain) level. The –dB LED on
indicates a negative (attenuation) level. Both LEDs on indicate 0 dB.
By noting these LEDs’ displays and counting the number of 1 dB steps
you increase or decrease the audio level (step 4 and example 8, step 2a),
you can determine the exact input gain or attenuation setting.
b. The Power LED blinks to indicate the adjusted audio level (compared to
the internal level, -10 dBV):
• When the LED is lit most of the time, blinking off only occasionally,
the level is too high.
• When the LED is off most of the time, blinking on (lit) only
occasionally, the level is too low.
• When the LED blinks frequently, the level is in the proper range.
c. The
LED lights steadily when the adjustment is at the minimum level
(maximum attenuation, -18 dB). The LED lights steadily when the
adjustment is at the maximum gain (+10 dB).
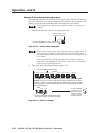
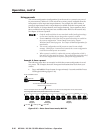
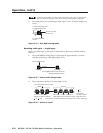
4. Press and release the
and buttons to increase and decrease the audio
level by 1 dB or press and hold the buttons to increase or decrease the level by
3 dB per second. The or LEDs flash to indicate each 1 dB level change.
Each time you press the or button, wait for the or LED to flash
before pushing the button again. Pressing the button too rapidly may not
increment or decrement the audio level.