


Operation Falcon 36 Operation Manual
GBC Pro-Tech 1997 October
3-6
0RXQWLQJ2QO\
This process varies only slightly from the One Pass
Mount and Laminate process.
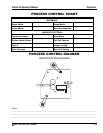
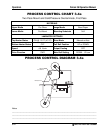
1. Adjust the machine settings as shown in process
chart 3-3.
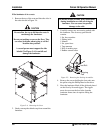
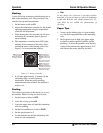
2. Insert Falcon Board, adhesive side down, into
the nip. Lower th upper main roll until it
contacts, and then turn it another 1/4 turn. Press
the footswitch to remove the board from the nip.
3. Lay the image onto the adhesive side of the
Falcon Board. Tacking the image down with a
tacking iron at this point is sometimes helpful.
4. Press the footswitch and carefully insert the
board and image into the nip. Be sure to keep it
perpendicular to the laminating rolls and
maintain paper tension throughout the process.
⇒
Note
Some images will release toner or ink to the upper
laminating rolls. If this happens, clean immediately
with alcohol. To prevent this problem, a sheet of
paper can be used to cover the image during the
mounting process.
7ZR3DVV0RXQWDQG/DPLQDWH
&ROG2YHUODPLQDWH
For this process, the image is first encapsulated and
then mounted.
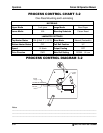
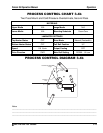
1. Adjust the machine settings as shown in process
chart 3-4a and remove the infeed table.
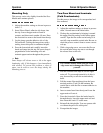
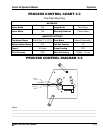
2. Web up the overlaminate by bringing it around
the upper film idler and up to the release paper
rewind. Tape the film to the rewind and give it
one full wrap around the rewind tube. Be sure to
check the process control chart to ensure correct
web up.
3. With a singe edge razor, cut across the film on
the rewind tube, being sure not to cut through
the release liner or the rolls.
WARNING
Use extreme caution when using the single
edge razor not to damage the rolls or cut
yourself.
4. Peel the film back and drape it over the upper
main roll. To get enough material to do this, it
may be necessary to turn the rewind tube by
hand.
5. Pull the mount film straight up from the lower
unwind position. Tack it to the laminate. Be
careful not to stick the film or mount adhesive to
the machine.
6. Insert a starter board into the nip and lower the
upper main roll onto it.
7. Press the footswitch. Once the leader board is
through the nip, lower the upper main roll and
then rotate the crank 1/2 a turn more.
8. Reinstall the infeed table. You can operate with
or without the pull rolls at this point.
9. Encapsulate the images.