


Maintenance and Troubleshooting
F-36 PRO Laminator Operation Manual
4-6
© GBC Pro-Tech 1999 January
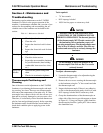
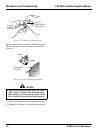
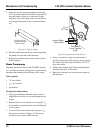
5. Adjust the nip by turning the adjusting bolt using
an ¾" open end wrench (clockwise to lower the roll
end and counter clockwise to raise the roll end).
Adjust the ends of the upper main roll until there is
an even gap between the rolls as shown in Figure
4-5.
Figure 4-5: Properly Set Nip
6. Hold the adjustment bolt in place while tightening
the jamnut on each side of the laminator.
7. Replace both cabinet covers and reconnect power
to the laminator.
#$
Adjusting the chain tension on the F-36 PRO Lamina-
tor is a simple procedure that keeps the system running
smoothly and maximizes the efficiency of the motor.
Tools required:
•
1
/
8
" hex wrench
•
3
/
16
" hex wrench
• Screwdriver
To adjust the chain tension:
1. Unplug the laminator and make sure it won’t be
plugged back in while you are performing this pro-
cedure.
2. Remove the drive side cabinet cover using the
1
/
8
"
hex wrench by removing the six screws holding the
cover in place.
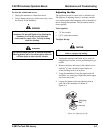
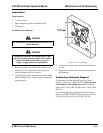
3. Loosen all four motor mount bolts using the
3
/
16
"
hex wrench as shown in Figure 4-6. The motor
should just move freely within the slots.
Figure 4-6: Adjusting the Chain Tension
4. Using a screwdriver, apply a small amount of
downward pressure on the motor by prying against
the inside of the side frame until there is ¼" to ½"
play in the chain.
5. Tighten the mounting bolts while maintaining the
downward pressure on the motor.
6. Replace the cabinet cover and reconnect power to
the laminator.
Properly Set Nip
(Distance Between
Rolls is Equal)
Loosen Motor
Mount Bolts
1/4" to
1/2" Play
Downward
Force Tightens
Chain