


87
4 Summary of the HP/Phoenix BIOS
HP/Phoenix BIOS (BIOS version: GX.07.xx)
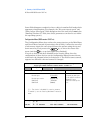
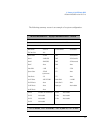
Disabling a device in the Configuration Menu (for example, Serial port B in
the diagram above) has the advantage of freeing the resources (such as
IRQs and peripheral addresses). Disabling a device in the Security Menu
disables the access, does not free the resources, but has the advantage of
temporarily disabling the device without losing the configuration settings.
Under the “Memory and Cache” sub-menu, memory caching can be set to
internal only, disabled or both; the memory hole can be enabled
between 15 MB and 16 MB
1
; the graphic POST can be disabled if there is a
Display Option ROM installed; the shadow/cache ISA option ROMs can be
made accessible if detected as being fitted.
Under the “IDE” sub-menu, multi-sector transfers can be
disabled, or set
to
2
,
4
,
8
, or
16
; the translation method can be set to
extended
or
standard; the integrated bus adapters can be set to none, primary=IRQ15,
secondary=IRQ14, or both.
Security Menu (BIOS version: GX.07.xx)
Sub-menus are presented for changing the characteristics and values of the
User Password, the System Administrator Password, the amount of
protection against use of the system’s drives and network connections
(using the Hardware Protection sub-menu), and the amount of protection
against being able to boot from the system’s drives and network connections
(using the Start-Up Centre sub-menu).
The minimum lengths of either type of password can be set to a specific
number of characters, or to
none. The maximum length of each is
32 characters. A limit can be set for the maximum number of retries that are
permitted if the password is mistyped, and whether a delay should be
imposed (of successively increasing lengths: 4 seconds, 8 seconds,
16 seconds, and finally 32 seconds) before successive retries are accepted
(using the
exponential setting for the “Lock Time Between Attempts”
field).
The “User Password” sub-menu grants access to the keyboard lock timer
option. Once this password has been set, the menu gives access to the main
sub-menu of user preferences.
Under the “Hardware Protection” sub-menu, the following devices can have
their access
unlocked/locked: flexible disk controller, IDE controllers,
serial and parallel ports, network controller. Writes to the flexible disk can
1. available only if ≥ 16 MB.