


1-23
Installing the Tape Library
Step 6: Connect Library to Host
Installation
Step 6: Connect Library to Host
Do not turn on the host system or library yet!
1. Properly shut down all peripheral devices connected to the host computer.
If the host computer is connected to a network, be sure to check with the system
administrator before switching off power.
2. Switch off power to the server.
3. Connect the SCSI cables.
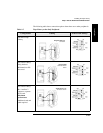
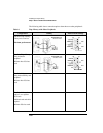
Before you set the mode switch, you determined how to configure your SCSI
bus (see the connection diagrams on page 1-21 and page 1-22). Using this
configuration, connect the library to the host. Make sure:
• You use the proper port (single-ended or differential).
• The last device in the SCSI bus is terminated.
4. Make sure the power switch on the library front panel is switched off.
5. Plug the power cord into the power port on the back of the library.
Stand-alone installations: Go to “Step 7: Power On the System” on page 1-27.
Rack mount installations: Go to the next section, “Routing SCSI and Power Cables
on Rack Mounted Libraries.”
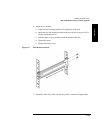
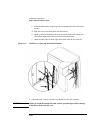
Routing SCSI and Power Cables on Rack Mounted
Libraries
CAUTION SCSI and power cables must be routed and secured properly on rack mounted
libraries. Failure to properly route library cables could result in damage to the
cables.
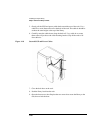
To properly route and secure rack mounted library power and SCSI cables:
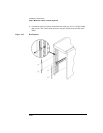
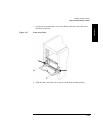
1. Route the SCSI/power cables through the strain relief bracket:
a. Squeeze the two plastic ends of the cable strain relief bracket together.
b. Pull off the plastic strain relief clamp.